Pages

Showing posts with label Valentines. Show all posts

Tuesday, 11 July 2017

... Blog Title: Gina K Designs –Inspiration Blog Hop – Day 2


The Cast and Crew for Gina K Designs welcomes you to another fabulous blog hop celebrating the new stamp sets by Gina K and the illustrator team from Gina K Designs! We hope to inspire you with some beautiful card projects as you hop along to each of the designer’s blogs! Today, we are featuring the stamp sets by Beth Silaika and myself!

http://www.shop.ginakdesigns.com/product.sc?productId=2955&categoryId=16


I adore the whale in Beth's set and stamped it twice onto Gina K white cardstock. I coloured them with copics and then trimmed them out. I made a background panel by blending some Gina K Inks - I used Wild Dandelion, Jellybean Green and Blue Lagoon. I speckled the panel with some water and layered on my whales. I made some fun water spouts with pva glue - I just 'drew' the spouts freehand with the tip of my glue tube. It dried nice and clear and then I went over the spouts one last time with the glue again and this time added some white glitter, I love how this turned out.


For my dolphin card I stamped the dolphin 4 tames and coloured him up. Again I stamped on white cardstock and trimmed them out. The sentiment panel was cut out with a circle stitch die from the Gina K/Thermoweb stitched circle die set. 

I'm excited about that background - I used one of the new Gina K STENCILS!!! it's called Water drop and instead of using it as a stencil, I embossed it onto white cardstock befroe sponging with Wild Dandelion and Sweet mango inks - I LOVE the look!

I arranged my dolphins around the circle to finish. 

Next up - my new Lovely Lilies set.

http://www.shop.ginakdesigns.com/product.sc?productId=2950&categoryId=16
  
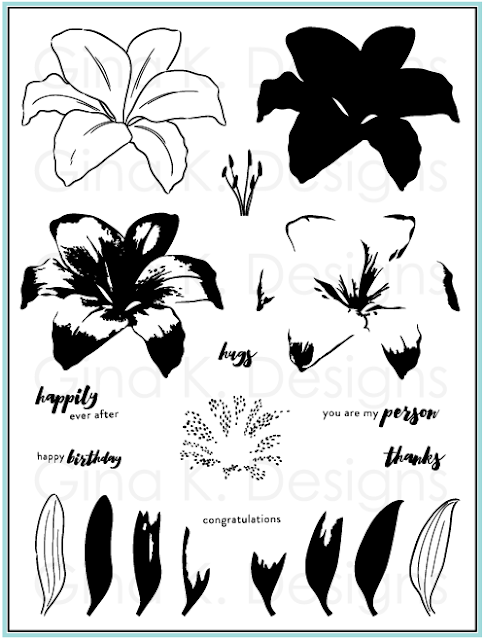
This is a layering set and it's quite easy to achieve different styles of flower with this set.
My first card is bold and contemporary - I used just the solid stamps to make the flower for this one. I trimmed it out and popped it up on a sponged background. I used a sentiment from Chris's new set (more on that tomorrow).


To achieve a more traditional style I used the outline stamps on the next couple of cards - I only used two of the solid layers on this flower. There's a handy graphic below that shows how to layer the solid stamps. I'm prepping a quick video on layering these.


 For the card below I created my blooms in the same way, I stamped two of the solid layers in Tomato Soup and Innocent pink. Then I stamped the outlines and stamens in Dark Chocolate. The stamens were clear embossed also. The speckles were stamped in Lipstick. I layered them over some leaves and popped them up in front of a background that I created using the Cottage Garden stamp set. I thought it made a charming backdrop for this happily ever after card.

This graphic gives you an idea of how the layers work together.

I hope you have enjoyed these samples and I encourage you to pop over and see what the rest of the Gina K folks have been making. Don't forget to comment on each blog for your chance to win a $50 Gina K Designs gift certificate! To see who won, check the Big News Forum at StampTV a few days after the hop. Ready for some inspiration?

Just click on the links below for more from Gina and the Cast & Crew:

Gina K
Beth Silaika - Today’s featured illustrator
Claire Brennan - Today’s featured illustrator
Cathy Tidwell
Chris Dayton
Donna Idlet
Juliana Michaels
Karen Hightower
Laurie Schmidlin
Melanie Muenchinger
Rema DeLeeuw
Sean Fetterman
Sheri Gilson
Silke Ledlow
Susie Moore
Theresa Momber

Don’t forget to pop over to the Gina K Designs Store and check out all of the new products available this month in the “What’s New” section at http://www.ginakdesigns.com.

Thanks for stopping by!

Monday, 2 March 2015

...Halftone Backgrounds


Good evening - are you enjoying the samples so far? the DT ladies and I have some Halftone Background samples for you today and after you have perused our projects you might like to enter our...
We are running a Pin it Competition for this release - we want you to Pin your favourite samples created by the WMS Design Team or myself for this release to your own Pinterest boards. You can pin samples from any of this release's sample posts from either this blog or the DT blogs. Use this hashtag - #waltzingmouse, then come back and leave us a link to the pin in the comments on this post. For each project you Pin just leave a separate comment.

One random Pinner will be chosen just before midnight (GMT) on the 7th March. The winner will receive a lovely £30GBP store code!

For those of you who don't have Pinterest, just leave a little comment here on this post telling us what your favourites are. A random commenter from this post will also be chosen and will receive a free set of Kaboom Stamps. Here's who's showing Halftone Backgrounds and the new Easter word die with me today:

I used the Halftone heart (Halftone Backgrounds) for my card and tag today. I stamped my sentiment first (from the Kaboom stamp set), onto some newsprinty patterned paper - I masked it and then stamped the heart in Melon Mambo (SU ink) and then clear embossed. Then I coloured the sentiment with copics and did a little sponging. The last thing was to add a few white gel pen highlights and I was very happy with this. It's got that old comic look about it!


Thursday, 5 February 2015

... How to art....?


If you remember, please let me know, I have forgotten. I need a Valentines card. I really, nearly, I mean it was in my hand, bought a card for DH last week at the grocery shop. January has been a helluva month - EU law compliance, tax month, the WMS sale, school visits, (my middle chick is moving to big school this year) but I baulked at the idea of paying an actual 5 pound note for a mass produced card, I mean I have every craft tool under the sun, I have cardstock by the acre, what the hell was I thinking? (btw for your information, NO handmade Christmas cards escaped Casa Brennan this year, not one.)

I don't know if it was embarrassment that kicked in, I can't claim that it was artistic pride, but I couldn't do it. I have to make DH a card.

Thing is, I sometimes forget how to art. Six years ago I'd a stamped myself a bit of patterned paper, cut out a label shape, slid a bit of ribbon across the centre, popped a sentiment on the label and stuck it right smack dab in the centre. Job done.

Card making has evolved a little since then and there's a move towards what I like to call 'Art cards' folks all over the planet are watercolouring, zentanglng, hand lettering, foiling - it looks fabulous and I'll be right out to join you, soon as I finish my homework. In the meantime, here's a little number it only took me 3 days to put together....  in between Tax returns and other glamorous admin tasks..... bet you envy me...

So for my 6.5 by 4.5 inch card, I used the Zig Zag Bacgrounder - I swiped a teal coloured ink pad rather randomly across it and then spritzed with green inky water, I smoothed some watercolour paper down on that and peeled it off to reveal a suitably arty background. I used the My Heart dies to cut the heart shapes and coloured two of them with watercolours. The smaller heart at the top was also stamped with a knitted texture from Faux Fun and the middle heart was clear embossed with a stamp from My Heart Stamp set before being watercoloured. I added some vellum into the bottom heart, and mounted all over some sequins that I just glued on randomly. The wooden word was from a pack of wooden words I found at a 'The Works' store last week. Their budget crafting items are quite good sometimes. The wee shiny gold heart at the top was die cut from a larger sequin using the heart grommet die from Folding tags die set.

Saturday, 12 January 2013

...My Heart Cut files Now available


Morning folks, it's been a while since I have blogged and I wish I could say that my time was filled with busy happy Christmas bustle, but like half the population we got flu.....

Anywhoo, I'm limbering up to get back up on the old saddle and get started with 2013... Just today I am making some cut files available for the My Heart set - this is our Love themed set that we released just before Christmas. I love using it with the Woodgrain....oh bliss...I white embossed the woodgrain backgrounder onto white card and then swiped over with tumbled glass distress ink to get the card base.

Both of these sets are currently available form our USA base, and if you have not heard about our USA shipping, we are tentatively making some sets available to ship within USA which means that USA folks will not have to wait just as long to get their hands on the new goodies...we've been really encouraged so far and hope to roll out availability on all sets over time.

The thing to remember is to be sure to select the USA shipping from the drop down menu when ordering, and to make sure all your goodies have that option selected. Our USA shipper is currently at CHA and so USA shipping will resume Jan 15th.

I have a collection of 10 cut files in the My Heart set and they will enable you to eke out unlimited usage for your My Heart sets. Perfect for Valentines and beyond, I'm itching to use that laurel wreath in particular on some wedding cards...I just need somebody to get married....

The cut files are available in both .svg and .dxf files and there is even a handy file which includes all the shapes set up together so you can cut a whole batch in one go. There is a small charge for this set of cut files, but I do intend to keep making random free files available. I can't do them all free as I have to spend the time setting them up and I also have to pay to have them hosted etc, but the more cut files I sell, the more I will be able to offer for free...if that makes sense...LOL!

You can see all the shapes included in this set here.


One of the things I am oving about my Silhouette Cameo is the ability to use their super simple software to produce mats for my cut files, this is something I love to so. you can see on the close up here how I made mats in Kraft cardstock for my cut files. It's a super simple way to add definition and dimension to the cut out shapes.

The Software has a little tool, it's called 'Offset selected shape' and you can toggle it up or down to get the size of frame you want, it's great fun!


Anyhow, hope this tickles!


Thursday, 29 November 2012

...Introducing My Heart


Good morning and did you see what the ladies created for yesterdays previews? I was blown away!! You need to see what the ladies did with the Woodgrain Backgrounder before you sip another sop of coffee! Scroll down toe the previous posts on their blogs as you go by this morning!

Welcome to the second day of samples for our December release - it's a wee mini release, we have 4 sets for you. The set I'm showing a tiny portion of this morning is called My Heart.

Did your sweetheart ever carve your initials into a heart on a tree trunk? Nope? me neither, lol, but the idea is a sweetly innocent take on romance - perfect for Valentines. Ideal for cards for guys, and also for mass producing if your wee folks take goodies into school for Valentines. While I was drawing these up it seemed to me that hearts and woodgrain were perfect Valentine partners!

Since it's me and it's getting close to Christmas though I have other ideas for this set just right now but before we get to that, take a peep at what the ladies have created for us with this set and another of the new releases, Woodenheart Alphabet, a pretty rustic alphabet, perfect for adding your intials to the My Heart hearts.


I made up some wee bag wraps - this is the sort of thing that I could actually manage to mass produce under pressure. I'm thinking of end of term treats for the class, or party favours or even wedding favours, so super simple. You can make these easily by downloading the free cut file, which will be available freely from Saturday onwards at the store in the freebie section. The little window is shaped especially to fit a couple of the stamps from My Heart, but I'm sure they'd still be perfectly usable even without those stamps.

Incidentally, the white fuzzy halo I'm getting on my shots recently is driving me nuts...I'm sure it's a setting that I don't know how to set but bear with me until I find out...

The stamp I used is a rustic heart design with an internal wreath, plenty of opportunity to embellish this stamp - here I have used plain bling, coloured up with a copic pen to match my candy.


The wraps are designed to house plain cello bags, the sort of thing you buy to put cards in etc. - I would use pre-wrapped candies in them if I was unsure about whether they were foodsafe though. You can also use plain food/freezer bags trimmed down to size., just fold them over at the top and staple them once to the front of the wrap, just under the flap.


I have used only one single stamp for this mornings samples and I do hope to be back with more later, but I am rather excited to be working on the facility for USA folks to order these sets individually and so you might forgive me if I slip off and make sure that is in place for Saturday....

The set is a large 6x8 set with a total of 22 stamps. Six different heart motifs, one border stamp and 15 sentiment stamps on the theme of love. The stamps in My Heart are drawn to echo the grain of the Woodgrain Backgrounder set we previewed yesterday - I'm in heaven with matchy matchy - how about you?lol!

I will be making cut files available for this set.

Hope it tickles!

Monday, 13 February 2012

...first craft robo card


ED - Robin, I don't seem to be able to do a .gsd, is a .dxf any use?

And I have to say I'm liking it!! Not blowing my own trumpet, here, it's the craft robo I like! I created this cut file to test out my robo in conjunction with my drawing program (I use Illustrator) and I'm happy enough. If you look in the close up, you can see areas where the detail proved a letle too much for the cutter, but to be honest I'm an old fusspot and when you look at the card as a whole you really don't see the rough bits.

Nope overall, I'm impressed. I expect this guy to be great fun in my craft room, but I am missing those lovely embossed edges that I get with my dies, so I'm not about to swop, but I am very happy with this addition to my crafting cupboard!

You can get the cut file from HERE, we are currently having issues with the freebie downloads at the store (bought downloads are not affected). Feel free to use it for personal stuff, I hope it works for you, it's an SVG file, and please feel free also to leave a comment here telling me what sorts of files, other than svg, work for your cutters, If I can make a version for you of this and future freebies I will!

For my card I cheated slightly and created two mats, one slightly smaller that I cut out in yellow and put behind the main image, and one slightly larger in a darker purple.

Much sponging and stamping with a Nordic Winter pattern stamp to get a nice mottled effect on my purple heart...I was soo excited to get the machine going that I didn't really stop to think about what colour of card I was putting through...expect to see a much nicer colour scheme real soon!!

Anyhow, this was great fun!! hoping to experiment again soon!!
hope it tickles!!!

Wednesday, 18 January 2012

...a cuppa sweet


Good morning! Happy Wednesday! I made this little clay tag for yesterdays Blog Party and I thought I'd pop up a wee 'how-to' here today.

First though, a wee word about yesterday's Blog Party times - we will be reviewing the timing of our blog party for next month - my hand is right up in the air, I done picked a wrong time - I must have been somewhere in a giggly cloud of mulled wine when I decided on yesterdays times as it was pretty much impossible for anyone on this side of the pond to participate if they were at work yesterday...doh! My apologies for that!

So, what I'm proposing for the next blog part in February is this - I think I'd like to kick off the party link at around 6:30PM my time, and close it at around 4:00AM the following morning - I'm thinking that this will be between lunchtime and bed time in US...how does that sound?

So, our schedule for Feb would be something like this:

UK - 6:30pm 17th Feb - 4:00am 18th Feb
USA (New York) 1:30pm 17th Feb - 11:00pm 17th Feb
Australia (Queensland) - 4:30am 18th feb - 2:00pm 18th Feb
Canada (Alberta) - 11:30am 17th Feb - 9:00pm 17th Feb
Malaysia - 2:30am 18th Feb - 12:00pm 18th Feb
Norway - 7:30pm 17th Feb - 5:00am 18th Feb

OK, let me know what you think of the proposed times, and we'll try to take it into consideration, thanks ladies!

Back to yesterdays party and I must say tho, that the folks who were able to take part were on fire!! We'll be doing a little round up post on the 20th to point to a few that especially caught our eyes!! Outstanding stuff!

How-to

In the meantime, I have a couple of these little clay taggies to show you. Super simple, once these dry you can use them time and again, decorative ornaments, place setting ornaments as in my pic above, napkin tags...whatever tickles...

Can I just mention those delicious chocolates in the pic, they were sent to me by a friend in USA - I only just opened the package yesterday, I'm in caramel heaven!! Divine Caramel creations by Ellie...and they are!!


Here's what I did:

I made them from Fimo light, air drying clay. It is white when you purchase it and all you have to do is roll it out to the desired thickness and stamp it!


In the pic you can see a piece of it rolled to - I stamped it with the heart from Seasons of love tags. I used Stampin' Up cherry cobbler ink and just inked up as usual and stamped right onto the clay, I pressed it down a little all over and I was very happy to see that it held the colour really well. You will get a little hairiness in your impression and if you press too deep then you might find that other parts of the stamp also leave a trace of ink, but you only have to try it once to get a feel for it.


Next I set my Spellbinders heart tag die template on top as if i were going to trim it out and then I used a scalpel to simply trim away the excess clay.


When I removed the die I had a ready made guideline into which I pressed an embossing tool to create a row of dots around the edge. That was pretty much all I did, the hard part is waiting for it to dry...OOh and don't forget to make a hole for the ribbon if you are making an ornament to hang.


For the second ornament I simply trimmed the heart as before and then added some dots around the edge as before and stamped an unlinked sentiment and a scroll (Seasons of love tags) into the centre.


Once dry, I sponged it with Ink, the indented sentiment stayed nice and white, putty...I thought! And easy peasy!! Hope it tickles!

Thursday, 2 June 2011

... June SOAP, Day 2

 ED - A quick heads up - this morning my email inbox was flooded with emails that were dated from as far back as 10th May - It seems that some emails are reaching me, while others aren't! I am working to respond to the folks who, no doubt felt that we were ignoring them! I await the response from the email folks as I have no idea why this has happened! In the meantime, if you contacted us recently and got no response, please feel free to either message me on our Forum, or even Facebook, until I have confirmation that the email is running correctly. Thank you!!


Good morning and welcome to day 2 of the June SOAP event - did you manage to get around everyone yesterday ok, I know we had a few link-oopsies!

My little sample today features stamps from the Dainty Doilies larger set, I made a simple card by stamping the doily images directly on to my card front and then adding a little accent piece in the shape of a heart - I had white embossed one of the images onto vellum and punched out a heart shape, I then stamped the centre image inside the heart, layered on a button and lined it up over the doily. A little gel pen dotting and faux stitching and I was done!!


Just before you scoot off to see what everyone else is up to, I have decided to run a little comp today, I have a couple of spare July sets and I just thought, maybe, you might be interested....?

Here's the scoop - I invite you to leave a comment here to be in with a chance of winning! Tell me what you like best about stamping, is it the relaxation, the craftiness, the folks you meet through it? what do you like about it?

I will pick a random winner at the conclusion of our SOAP event - now get this - the winner will win one free set from the upcoming July release - BUT!!! and pin back your ears - If I can find you on the forum - ie, if you have ALREADY joined the forum, and by that I mean BEFORE 8:00AM this morning, my time, you will win an extra bonus set!! AND If I can find a post that you have made on the forum - ie, if you have actually posted on the forum before this time, you will win another set!!! so, the potential is there for someone to win 3 free sets!!

This will not be the last forum based comp that I run, so if you haven't joined up already, there's no time like the present!! LOL!!!  Here we are.

 Now, I can't wait to see what the girls have made, here are their links!! Have fun!!


Friday, 21 January 2011

...welcome to the party!!


Good morning and welcome to the party! Usually at this time of the month we are having a release, but this month we're doing something a little different!! We are celebrating!!

What are we celebrating? Well, we are celebrating our good fortune, we got something rather special for Christmas, we were blown away to receive Spellbinder Grand Calibur machines!!

If you have visited me before you might know that I am ADD.IC.TED to Spellbinders die templates. All of them. I dare not admit in public how many of these things I actually possess...and if you tell my DH I will strenuously deny mentioning it...just kidding, he regularly packs them away for me after I have a craft explosion.

Right before I get on with the card deets let me tell you what's at the party for you! Opportunities to win free stuff!

The Party will last from today (Friday) until Sunday. 3 days.

• Folks who purchase anything during the 3-day event (8.00am this morning 21st Jan to midnight Sun 23rd - all my time) will be entered into a draw. One person will be randomly picked at the end of the 3 days to receive their shopping basket free!

• We will also draw one random winner per day from comments left on one of the DT blogs just like we do for regular releases (only there will be three days of winners rather than just one!). Each winner will receive a free stamp set of their choice!

• We will also be holding a special challenge after the party. At the end of the event, we will invite all you folks to CASE a card/project from the 3 days. You will have one week to link your entries to the WMS blog post and then we'll pick a random winner for a prize. You may enter as many times as you like. One random winner will receive a set of Grand Nestabilities Dies - Grand Labels 4 and a set of stamps of their choice!

DT ladies at the party with us today are:

Mona and Carly
 
Don't forget to leave the ladies a comment for a chance to win!

Grand Calibur - the low down!!


Soon as this was released I wanted it. I wanted it so bad. Turns out I have a fairy god-sister, because my wish was granted!!! I could not believe my eyes when this baby landed at the doorstep!

I have a purple wizard which I have always loved, and nothing on the planet embossed like my little purple dude, but the truth must be told, I live in a tiny house, and the crank was a little bit noisy for dead-of-night craft sessions. I also have a cuttlebug, and it's fine, the embossing is nowhere near the wizard, but it is quiet.

Then came the Grand Calibur. This machine is the answer to my current problems. I have found that the embossing is a lot crisper than my cuttlebuddy. And the Calibur is quiet. ahhh. The side handle features a generous grip, which I found very comfortable to operate. There is a suction plate on the bottom that actually sucks. And at last I am no longer rowing the wee cuttle across the table...lol!!

AND can you see the plates? They have the names printed on them. This thing is pretty fool-proof. Cutting and embossing sandwiches can be mixed up easily and the simple action of having the names printed on them is genius.

Huge tan embossing mat. Fab.

Living in a small house, I was a little worried that the Calibur would be a monster, but here you can see it beside my wee green thingy. It's actually not that much bigger, which makes the difference in cutting capacity so much more striking. Also there are no wings to fold out, just a little white 'tray' piece at the front which only needs to extend out about 2 inches at most. It's quite neat really, I was surprised by that.


The cutting capacity is huge. Here I have laid out two full sets of label die templates on the one cutting plate so that you can get an idea of how much you can cut all in one go.

I found that the Calibur cut all of these cleanly in one pass.


The opening on the Calibur is wide. UK ladies will be interested to note that A4 sheets can fit easily in the opening with no need to trim.

I tried a piece of standard US cardstock through the opening and had to crinkle the edge up slightly to feed it through the tray, I didn't mind this as i was interested in the die cut shapes and the edge was going to be scrap. If I was making a project using US cardstock, and I wanted the edges of the paper to be smooth, I can simply remove the white tray, 8.5 inch paper will then feed through no problem

There are a couple of methods for doing this and here is a link to a video showing how.


For today's card tho' I didn't even get as far as die cutting! lol, I used the tan embossing mat and a couple of little paper doilies to make a simple embossing on a piece of plain cardstock. You know how when you buy doilies there are sometimes 3 or 4 sort of stuck in a layer together? well, I didn't separate mine. I just laid them on the base plate. Put a piece of cardstock over the top and layered on the tan mat and the pink embossing plate, and ran it through.


I wanted to show you that even something as fine as a few paper doilies can generate a lovely embossed image to use on a card. I picked out the embossed detail with a little sponged distress ink. I dressed my image very simply with a button, a piece of ribbon and a couple of rows of faux stitching, done with a gray pencil. The sentiment is from Say It with Style, which, incidentally, was our first Spellbinder compatible stamp set, released in August 2009!!!


Later on, I had a go embossing whatever I found to hand - here I ran some pieces of tinsel through the Calibur and got a rather interesting rope effect, I hope to use this on a card tomorrow! I love experimenting!


Hope it tickles!

Monday, 17 January 2011

....January WMS Blog Waltzing...you in?


LOL, I cannot believe I made it!, I couldn't find my clear blocks!! I tidies them away before Christmas and couldn't remember where!! lol, finally got them at midnight!!!

So woohoo! here I am in the first WMS Blog waltz of the year! for details of how to play along check this page, or if you want to dive straight into the list of blogs/gallery posts participating go here (you will need to be able to access the forum to see the list). Don't forget there is a wee competition running...Have fun!!!

Anyhow, I have seen a stack of cards lately with wee dinky banners on them! I love banners and thought I'd make up some of my own. I wanted ones with a fancy top and so I die cut a large circular shape with the largest die in my Spellbinders Lacey Circles die set, which I will be adding to the store in the next day or so, along with some other goodies... (shameless plug!)

I sliced up my lacey circle pizza style to get my pennant shapes, sponged the edges, distress inks of course, and inked the edges with rich cocoa memento ink! Added a few buttons, strung them on some linen thread and set aside.

I wanted a sweet background paper to set them off and so I stamped my own with the polka dots from Off Beat Backgrounds and then i went in with the spotty heart from Sweethearts. The sentiment is also from Sweethearts.

I slung the pennants over the background, which I had cut slightly smaller than the card. I put a tiny piece of foam adhesive under each pennant shape to keep it up off the card.

I stamped the card base with a text background from Text-it - I love the extra long borders, they are more than big enough to fit the entire length of a card.

Hope it tickles, I'm off to have a peep at all the other blog waltzers!

Friday, 8 January 2010

...hey sweet thing!


Well I survived the dentist but I'm feeling rather bleh! I'll post this card because I had it prepared already but I'm not up for chatting...lol.

Background uses my newly released Faux Fun set and the heart and sentiment are from Sweethearts.

Many thanks for looking, chat to you soon.

Thursday, 7 January 2010

...Vintage Valentine


Last night my DH put the wee folk to bed which gave me a little while to play with my new stamps!!! I'm so excited about the Faux Fun set which released in my store the day before yesterday - scroll down to see the artwork for this set. It's a pre-order and will ship from next week - I pulled it forward to go with my Sweethearts set!

I used the large broderie anglaise border to make the faux ribbon for across the front of the card, I love the look of this vintage effect you get by using the second impression. I used Memento rhubarb, which is one of my favourite colours. The first impression was a little strong and so I ended up making the entire card using the second impressions. I'll bet there's a name for this and I don't know it.

I trimmed out the border roughly by hand and then distressed it with with a knife edge. Alternatively it could have been trimmed with a corner rounder, see here.

I made the patterned background by stamping the lace border from Faux Fun a couple of times behind where I wanted the broderie anglaise border to be. Above that I made a sort of negative version of the broderie aglaise border by using a clever little stamp from the Faux Fun set - if you look at the artwork for the set - it's the second stamp down on the right hand side. If you stamp it repeatedly beside itself you get a pretty, simple border in the same style as the solid border. I used my favourite Antique linen Ink for this (Ranger) I also smooched around the edges with antique linen and rhubarb.

The main focal point was the heart stamp from Seasons of love - Tags, together with a sentiment from the set, stamped in rich cocoa, second impression, memento ink.

I finished off with two little hearts from the Sweethearts set, both stamped in rhubarb but one distressed a little by pressing it against the lace border stamp before making the impression. Hand trimmed and distressed.

I love how the colours worked for this, so soft. Hope it tickles!!


Don't forget!!

Folks whose orders go through before midnight tonight stand a chance of winning their entire shopping cart for free!!!!!!! I will announce a winner at some point tomorrow, my apologies for being vague but I have a scary dental appointment tomorrow and can't guarantee just at what point I'll be lucid enough to post!! lol, wish me luck!!!

Tuesday, 5 January 2010

NEW stamp sets released! - Sweethearts and Faux Fun

ED - you must pop over to Anya's right now and look at this!!

ED - I've been using the large EK success punch - oops didn't realize there were several pink ones, obviously there are holes in my stamping arsenal that must be filled forthwith!! lol, apologies for the confusion!!


Welcome to the January 2010 release!! Today, in fact right now, I am releasing two new sets of clear photopolymer stamps!! Here they are:


Set size - 6 x 8 inches

Lace - I love lace! It's such a fab border to add to many different types of cards/scrapbooks and altered items.

There is one fancy lace border and two sizes of broderie anglaise borders and look for the neat trimming trick on my blog!!!! you can 'cut out' the broderie anglaise borders with a basic EK success corner punch, just remove the guard an use it as a scallop punch! See the blog for more details!! Extra broderie anglaise details mean that you can create focal points to complement your borders!

Just a word of advice - you WILL need to stamp the broderie anglaise borders with the help of a piece of fun foam or an upturned mouse mat under your cardstock or you will not get an even impression. Again see my blog post for advice.

Also included in the set is a huge Knitted pattern background/border stamp. A matching, heavier weight knitted panel and a little row of knitted stitches for extra emphasis.

The fancy lace border measures just under 6 and 1/4 inches long. The large knitted panel measures 2 inches by 5 and 3/4 inches, the broderie anglaise borders are each 6 and 7/8 inches long.


Set is 6x8 inches

A set of Lovey-dovey stamps to use when you're making up your Valentines treats, Anniversary cards, treats for the wee folk or just for a good old I-love-you type cards!

A host of sentiments good for the insides of cards as well as the front, including the much looked for (by me) "Guess who?", and "from your secret admirer".

A large dotty heart compatible with the EK success heart punch (the pink one) and 3 sizes of 'plain' hearts suitable for the 'kissing' technique! see HERE, LOL, Ideal for making patterned hearts to match your project backgrounds! These hearts do not match the spellbinders hearts they are a different proportion, for a heart to match spellbinders see the Seasons of Love - Tags set.

Also included is an elegant bow and arrow and lone arrow, just right for piercing any colour of heart you care to stamp! lol.

The 'Hey! sweet thing' sentiment measures just under 2 and 1/2 inches long by 3/4 inches tall. The arrow measures just under 2 and 1/2 inches long.

The sets can be purchased by visiting my store, click on the image to pop over.


All sets retail at an amazing £13.50 sterling each - check out how many images and sentiments are in each set!! (approx US $21.61, Canada $22.44, Euro 14.95, Australian $23.68 - all values approximate as of 5th Jan 2010 and subject to change - source, XE.com)

And yes! - I ship everywhere, lol.

Scroll down and bask with me in the reflected glow of love produced by my DT l
adies this week!!! LOL