Pages

Showing posts with label Halloween. Show all posts

Friday, 4 September 2015

Halloween Witch Freebie digital stamp

http://www.waltzingmousestamps.com/collections/freebies/products/freebie-halloween-witch-to-colour
So have you ever looked at our Halloween Party stamp set and wonder what the witch actually looked like? 

Well, just for fun, I have prepped the drawing of her - from before she became a silhouette - as a freebie digital stamp.

http://www.waltzingmousestamps.com/collections/halloween/products/halloween-party-stamp-set

Sometimes I draw stuff and then completely change direction - and that's what happened with Winnie here, she started as a picture and morphed into a silhouette - the poor dear has been languishing in a back drawer of the computer for quite a while, and I thought I'd let her out - she makes a nice freebie - n'est ce pas?

If you would like to download her - simply click on the image (or here) to go to the freebie page at the store :) - I'd love you to show me what you make with her - you can tag us on facebook or instagram!

Saturday, 22 August 2015

...Oversized Paperclips - Boo and Friends


Good evening folks - how are you? It's been a virtual craft desert around here I know but I have a quick little project to share with you this evening featuring the Boo and Friends stamps and dies.
Feel free to pin these to your Halloween inspiration Pinboards at pinterest - or wherever else you keep your ideas! 

http://www.waltzingmousestamps.com/collections/halloween/products/boo-and-friends

I made some oversized paperclips, because a) I found a couple of boxes of oversized paperclips while I was burrowing in the craft room looking for something else and b) because these are handy dandy little items - I can use them on notebooks, they are also good for closing paper bags etc, they are fab as bookmarks, which is something I always need and also, these are great for bribing the kids.... not that I need to bribe my kids you understand...

Simple ingredient list for these:

• Stamped image - which has been trimmed out with the matching die - I'm using Batty Boo here.
• A piece of co-ordinating card - for the back piece - also trimmed with matching die.
• A piece of thin foam - I'm using black fun foam (cheap in 'The Works' store in UK currently)
• A large paperclip.
• Superstrong glue - I used a combination of our extra strong Double Sided Tape and also liquid glue for funny shaped bits.


It's a pretty straightforward assembly job - but the one piece of advice you should take away is to flatten the foam with the paperclip BEFORE sticking the front on - press the paperclip in really well, until it leaves an imprint - like in my pic below - that way, once you have applied glue and stuck on the front - you won't end up with a paperclip shaped bump in your image. :)

Sandwiching the foam between the two card pieces gives the paperclip top a little chunkiness, which feels better and helps it to last longer than a simple card topper - If you really want to get the maximum lifespan from your paperclip topper, I'd advise varnishing with some sort of clear varnish - at a push, 2 parts PVA glue mixed with 1 part water should do it.


I love all these guys, but this one's my fave...


Hope it tickles!

Thursday, 30 October 2014

... last minute Halloween freebies and ideas


http://www.pinterest.com/wmstamps/halloween/

Folks I'm sure you are all knee deep in pumpkin guts right about now - and have all your gift packs all made up, labelled and ready to go, but, If like me, you are still scrabbling with trying to set up your party and make cards you can get more Halloween Inspiration here on our Pinterest Board (the Vampire blood bottle was a project from the Wanda's Pantry release)

And on the off chance that you are in need of any practical help with your last minute prep here are some freebies:
 
 Downloadable printable Bat Poop poem, click here to go to the store where you can download it:
This works great with purple or green millions, chocolate covered raisins, or even just plain raisins if your cupboard is depleted like mine...

For super fast treat containers, you might like these twist pouches, click here:


And these open sweetie pouches, great for the table, click here to go to the store and get the free template:


And this fun Warty Witch - click here - be sure to leave one end of her unglued so you can add sweeties!


Thursday, 16 October 2014

...Boo to you! and a debossing tip


Folks did you enjoy the PJ party? I must admit I am only just getting started today - I loaded the post on Tuesday night and was able to hang around for an hour or so to make sure it was all going and then I went to bed, woke up with a wicked sore throat and temperature, ugh, had a small home from school sick also and spent yesterday pretty much wiped out on the sofa!

I had a quick look and the entries look fabulous and I'll be getting round all of them today! The random winner has been announced - scroll down - to see if it was you!

This card is quite simple, I found some fabby copper checked paper while i was cleaning up and took my cue from that! The Owl (A Great Big Owl)is quite detailed so I didn't add much, aside form a sentiment which I embossed in copper to pick up on the BG paper- quite liked it!

this card was atrial for the embossing challenge so I had added a little embossing using a die cut blank of the owl:

It can be tricky to stamp in a depression - so I stamped the image first


then I die cut an owl from a piece of scrap card (Great Big Owl die set), 
and placed the negative shape over the stamped image
 then I placed the die cut blank back in the hole.


I secured it with some tape, I'm using lo-tac masking tape here

then I ran it through the Grand Calibur - it gave a lovely debossing all over the stamped image, a very subtle frame effect.

Hope it tickles
Chat tomorrow!

Sunday, 14 September 2014

...Welcome to the September Pajama Party!


Hello folks and welcome to our September Pajama Party! So glad you could make it - we have some fun challenges for you tonight and we hope you can play along. If you saw the Invite post you will be familiar with the challenges and you may even have you cards all ready to link up, but don't worry there is plenty of time to play if you are only just joining us - the links will remain open for 24 hours! (this post went live at 11:45pm - UK time on the 14th, so you have 24 hours from then!)

PJ Party Schedule:
The PJ party post and all challenge links are now live since 11:45pm on the 14th Sept - Folks have 24 hours to link up their challenge entries. - The PJ party winner will be announced at 11.45pm on the 15th Sept.

Rules - a little housekeeping!

• You don't have to use Waltzingmouse Stamps to play along,
but it will make us especially happy if you do! 
• You can enter each challenge as many times as you like, using separate cards
and separate links, but you cannot enter any one card in more than one challenge!
• Links should take folks directly to the blog post/spot where we can see/
comment on your challenge entry.
• Please mention our PJ party and challenge on your blog or gallery post
(- you are welcome to grab the PJ logo or sketch graphic and
add those to your blog if you like)
 • You do not need to enter every challenge, but the more entries
you have the better change of winning the prize!

Prizes

We're changing up the format of the prizes a little - we will have one overall winner chosen at random from the 4 challenges. The prize winner will receive £30GBP store credit for Waltzingmouse Stamps.

Now please note - this is important - if the winning entry uses Waltzingmouse brand stamps or dies the prize will be doubled and the winner will get £60GBP (approx $98USD)!

Please note that projects using only free WMS products will not be eligible for the double prize - though you could still qualify for the £30GBP!

OK, now we have the challenges, we have a couple of samples to get you going:


Challenge 1. Doodle Do
Make a project using this technique - stamp an image or 
sentiment and then add some hand doodling!

ideas from the WMS DT - 


from Claire - If you click on the pic it will get bigger and you'll see where I doodled kisses and hugs, (x, o) all over the 'happy' sentiment, the happy cake and candles immediately made me think of the Eat Cake set, and so I pulled that out and stamped the solid cake, I did a little doodling on the cake also, I just used the cake decorating stamp for inspiration! A white gel pen really makes the doodles stand out!


from Julia - click on this pic to make it bigger and you will be able to see how Julia has coloured her leaves using a pen dotting technique - this is super effective and rally gives that rustly old leaf effect, genius Julia! The oak leaf image is from Peace and Plenty and the background was created with the Cabin Plaid Backgounder, this card


Link your  Challenge 1. Doodle Do entries here: 


Challenge 2. Too cute to Spook
Make a project featuring Halloween cuteness - we want to see sweet treats and dinky delectables for Halloween - the sort of thing you might rustle up for the wee folks.

ideas from the WMS DT - 


from Claire - I remember when we launched the folding tag dies, Karin popped a little sewing kit inside for her release sample, and I have been wanting to put things inside those tags ever since, I made a tiny pocket out of vellum and stitched it to the tag, the closing tab on the tag holds it closed even with a few Tic Tacs in there, these tags would be super attached to pencils or other stationery items for a class giveaway. A chalkboard Boo popped up on the front - since these could be class treats I thought chalkboard technique was the one to use!


 from Jeanne - Boo and friends paired with the Opera Tags Stamp set - super combination!


 from Julia - Boo and friends paired with the stitched tag die and Zig Zag 
backgrounder for a little zing.

Link your Too cute to Spook entries here: 


Challenge 3. Old Pajamas
Make a project using any of your older Waltzingmouse Christmas sets - For our samples, we have blown the dust off our Seasonal Flourish sets!

ideas from the WMS DT -
 from Jeanne - Bright Season stamps are a classic match for the Seasonal Flourish sentiments.

from Anya - I love how Anya matched the dainty cups from Afternoon Tea with 
her warm Wishes sentiment from Seasonal Flourish sentiments.
 

 from Julia - classic silver embossing on a blue ground, the crown is from Seasonal Remedies.

 from Tosha - does't that Vintage Christmas Backgrounder look smart in red with 
the black and white, super pepperminty candy fresh!

 from Lynn - stunning silver embossing on the Ornate Ornament stamp, and I think I spy Alpine Christmas snowflakes in the BG...

 from Karin, cosy felt flower with Camellia leaves go beautifully with this lovely flourished sentiment on Karin's card!

Link your Old Pajamas entries here:


Challenge 4. Bedtime Story Sketch
ideas from the WMS DT - 

 from Claire - That Alpine Christmas mountain range die is one of my most favourites! A different texture was added to each mountain range, it works beautifully with the Seasonal Flourish stamps!
 from Jeanne - The Picot panel die is lovely as the centre panel on Jeanne's baby sketch card. 
It could be a boy... :) dainty little images from Vintage Baby Shower, sentiment from Little Darlings sentiments.


from Tosha - Boo and friends on the front of the folding tag, and a mix up of Peek a Boo sentiments and the Great Big Owl inside, a super take on the sketch from Tosha!

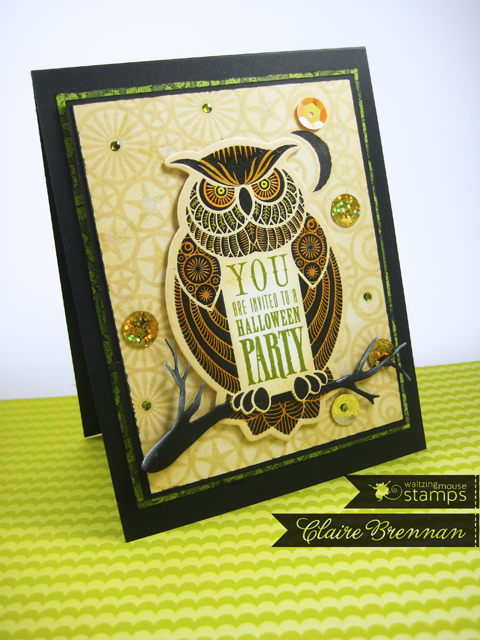
from Julia, I love that Julia used the Great Big Owl as the centre panel for the sketch, and look at his eyes glowing, those are amber gems, I think! a great spooky look for Owl!

Link your Bedtime Story Sketch No. 6 entries here:


Good luck ladies - I look forward to seeing what you all come up with!

Friday, 5 September 2014

...You're Invited


Evening folks! We made it to Friday! Yay!

Been playing around with A Great Big Owl set and I love how easy it is to make a detailed focal point so fast! All of the detail is in the stamp and all I had to do was stamp it. I clear embossed my black image because I knew I would want to add a little colour and copicand Versafine don't mingle so well sometimes. You could use memento black ink, but I love the depth of colour I get with the Versafine inks.

I used the owl image with the blank centre panel so I could add my sentiment in his tum. There's a good selection of sentiments to chose from in the set. I used the matching dies to cut him out and to cut a branch out of black card. There is also a wee die in the set that you can use to cut around the bottom of his toes/talons/feet I'm gonna call them toes. See here for how to use that die, super simple.


I made the background panel by stamping a pattern with all of those circular stamps that come in the set - some of the circular stamps are specific things like stars, eyes and a moon, others are decorative, but there is enough variety to enable the creation of interesting pattern, if you like to stamp!

the circular shapes also proved a good background for attaching embellishments like sequins, my new faves...

Well I love that it is Friday, but I still have plenty to do, I need to get my PJ party post written and then I have oodles to ship out to the DT - and I have a few more makes on the go - what are your plans for the weekend?


Hope it tickles!

Wednesday, 3 September 2014

...boo


Afternoon folks! I have a super simple little card today - I made it with the bonus die that you can find inside the little bat die from the Boo and friends Bat die set.

http://www.waltzingmousestamps.com/products/boo-and-friends-batty-die-set 

It's the circular die you can see inside the bat shape in this image.
Use a pair of small pliers to remove the circular die from the bat. I sometimes smooth those little remains of the joining tabs with a file, it's best not to leave any sharp edges, future you will thank yourself.


This little disc can now be used to cut  a spooky face into a card front or a tag! Depending on what side of the card you use your face can look in either direction! For my card above, I just used a plain black card base, cut a spooky face and mounted white card in behind. The speech bubble sentiments from the Boo and Friends set work great with this wee die!


Hope it tickles!

Wednesday, 27 August 2014

...New stamps for August!

 http://www.waltzingmousestamps.com/collections/boo-collection
http://www.waltzingmousestamps.com/collections/little-darlings-collection

http://www.waltzingmousestamps.com/collections/vintage-baby-shower-collection

http://www.waltzingmousestamps.com/collections/great-big-owl

Good Evening ladies - I have a very long release post for you today -
8 Stamp sets and 11 die sets!
Since it's been a while - allow me to refresh your memory about our FREE SHIPPING offer:
There is Free Shipping on all orders over £60GBP - 
and yes, that means free shipping to anywhere in the world.
http://www.waltzingmousestamps.com/pages/our-thank-you-to-loyal-customers
Remember we also have a Rewards Program now - and yes we were able to backdate that for a whole year when we started running it - so even if you have not shopped with us in a while, you may already have some points gathered up! Just click the little 'Rewards program' tab on the store to check it out. points gathered turn into discount! discount is available on everything - even digitals!

OK, One last thing before I let you lose on the goodies - 
the DT ladies have a last round of inspiration for you - here they are (don't forget to comment!):

Lynn, Kelly, Renee, Becca, Karin, Teresa, Jeanne, Julia, Jen, Anya, Laurie, Sandie, Tosha


Here are the New goodies for August
 

Great Big Owl Stamp set 6x8 inches £15.95GBP


Great Big Owl Die set 5 dies £12.99GBP

Boo and Friends Stamp Set 6x4 inches £9.95GBP


Boo and Friends Bat Die set of 2 dies £5.99GBP


Boo and Friends Ghost die set of 3 dies £4.45GBP


Boo and Friends Witch Die set of 2 dies £8.50GBP


Boo and Friends Vamp die set of 2 dies £4.75GBP


Peek-a-Boo sentiments Stamp Set 6x4 inches £9.95GBP


'Tis the Season Stamp Set 6x4 inches £9.95GBP


Hello Happy Thanks Stamp Set 6x4 inches £9.95GBP


http://www.waltzingmousestamps.com/products/picot-panel-die-set

Picot Panel self Matting Die £6.50GBP


Vintage baby Shower Stamp Set 6x4 inches £9.95GBP


Vintage Baby Shower Die Set set of 4 dies £16.99GBP


Little Darlings Sentiments Stamp Set 6x4 inches £9.95GBP


Little Darlings Images Stamp Set 6x4 inches £9.95GBP


Little Darlings Cradle die £5.79GBP


Little Darlings Pram/Baby Carriage die £6.35GBP


Little Darlings Bassinet/Moses basket die £4.89GBP

Little Darlings Bow Die £4.25GBP

 Now if you are in the mood to read on I will show you my Great big Owl


I really wanted to make this guy 'perchable' and I do this with the help of the matching die set. Fist, I stamped the owl in black - I clear embossed him at this point as I was going to colour him with copics. Then I trimmed him out with the die and colored in the white card - I knew he was going on a black background.


then, I placed the little 'claws line die right on top of his feet. Even though you cannot see the cutting line when you do this there is a simple way to make sure it lines up - see where the red arrows are - I just made sure the centre of the metal at both ends was 
centred on top of the last toe/claw on each side.


This is how it looks when the cut was made - perfect.


At this point you can slide a branch in underneath his toes!!! The Great big owl die set contains a branch die which is a perfectly sized perch for him. Love this tip.


I simply mounted him on a layered card base - he really is a big chappie


Hope it tickles!