Pages

Showing posts with label coffee. Show all posts

Wednesday, 25 January 2017

...Let's have Coffee...and a sale at Gina's!


Evening folks, hope all is well where you are. Fancy a coffee? Fancy a bargain (Gina's having a wee sale, deets further down the blog post)

This was a really difficult card to make... it took me all last week just to get through the door of the studio... do you ever have trouble getting going again after a break? I really do. Once I got in there it all came together within about a half hour, which is about how long I always expect to take to make a card, but rarely do...

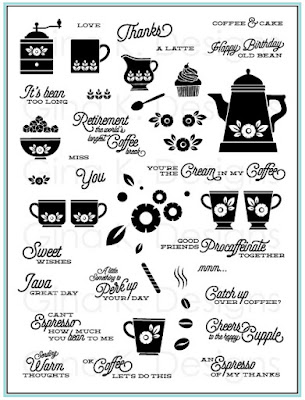
Anywho, to kickstart my January crafting, since there's less than a week of January left, and people are already talking about summer holidays, I dug out some zingy orange card stock and made a little paper awning to go with my cafe seats stamp from the Petite Patisserie set.

I cut a strip of the paler orange the same with as the white strip of card that my image was stamped on. Then I adhered 4 skinny strips of the darker orange on top of the paler orange and trimmed the ends to look like awning. I stuck the top end to the card base, but popped up the bottom up on several layers of dimensionals so that it sat out from the card and created that overhang. I had already scored a line across the awning about a quarter inch from the end, and so I folded that a little to help the shape along. Then I stamped a 'Caffetteria' sign (from the set) and trimmed it out with scissors and adhered to the fold.


I thought it was simple, yet striking enough to make an interesting card. I hope you like it. I coloured my stamped image with colouring pencils to match the orange cardstocks.

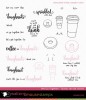
If you haven't seen the Patisserie set, here it is below: it's a nifty set full of sweet things to help you celebrate birthdays etc! Clicking on the image will take you to the set in the store - and that's a good thing because Gina is running a little sale - you can get 15% off right now (offer ends 1/26/17 at 11;59pm - and remember that's USA time!)


http://www.shop.ginakdesigns.com/searchquick-submit.sc;jsessionid=E3EFD29FB2F9A5DAA34A77477FCC12AD.p3plqscsfapp002?keywords=patisserie

Here is a link to my Pinterest page showing examples of cards made with Petite Patisserie:

https://uk.pinterest.com/wmstamps/petite-patisserie/

Monday, 27 June 2016

...an espresso of thanks


Howdy do? I'm taking the ostrich approach to politics this week and just sort of ignoring everything that has been happening with Brexit etc, I've no clue how all of this will pan out and sadly I don't think the folks 'in charge' have any clue either...but hey-ho the sky hasn't fallen in today so far, so here's a card.

I made this for last weeks MIUM challenge over at Stamp TV forum. I must admit I'm pretty hit and miss with challenges, but I wondered what MIUM meant and nope, I'm not going to tell you - pop over here and see this weeks MIUM challenge for yourself, lol!! and then maybe you will be reeled in like I was!

Anywho this card started as a great excuse to further explore my new Gina K inks and I am smitten, I'm loving these inks for solid images, I'm loving how the stamped image seems to sort of smooth itself out as it dries, the coverage is so good and the colours that I have used so far are scrumptious.

I stamped my coffee pot and did a little random shading with a brown colouring pencil just to give the image a little depth. I didn't bother with working out where a light source would be or anything so complicated, I just added a little rough shading on areas of the image that I thought would look good. I wanted to keep the illustrated feel rather than make it look too realistic.

I used the Coffee Set stamps, just released at Gina K's for this one. Huge mileage in this set, many, many sentiments for lots of different occasions.

http://www.shop.ginakdesigns.com/product.sc?productId=2528&categoryId=-1

How to ground a stamped image

Many times when you stamp an image, it can look a little lost there, floating on the page and when that happens you need to ground the image on the page somehow by making it look like it was meant to be there. There are loads of ways to do this, and I did it for this card by roughing in a suggestion of a tablecloth. Here's how, I'm using a slightly larger set of images on my example, but it's the same principle:

 I masked the bottom of the coffee pot with a post it. The I lightly sketched diagonal lines with a colouring pencil.


 Changing direction, I then went back and sketched diagonals going the opposite way. I sketch lightly and I stop short of the edge of the panel, I was just interested in creating a 'suggestion' of cloth, I wasn't aiming to actually draw a tablecloth. I lightly shaded a little crosswise also, but not enough to take away from the diagonal lines.


I removed the post-it note and had a nice tablecloth effect. You can see how I did the same thing on the actual card below. The background floral panel was stamped with flowers and dots from the same stamp set. Inks used were Sweet Corn and Dark Chocolate both Gina K Designs.


Thursday, 23 June 2016

... Cofee Lovers Summer hop, plus Candy!


Good morning! Great to see you, today I'm finally taking part in the summer coffee lovers blog hop! I'm sure you know all about it, but if not here's a quick link to all the Coffee Lovers website and main info page for this hop. There are oodles of prizes to be won and Gina K is a super sponsor (cough!, massive sale just begun at Gina's, cough!), you could win big just by taking part! Get your stamps out!


http://coffeelovingcardmakers.com/2016/06/summer-coffee-lovers-blog-hop-2/


This is my card for the hop today and I used my own coffee set, We Go Together, which is just 'new again', at Gina K Designs. I used the small coffee and doughnut from that set on this card:

http://www.shop.ginakdesigns.com/product.sc?productId=2529&categoryId=16

 I trimmed them out and coloured them with copics before placing them on the background panel that I had created with my new Gina K inks. I used the delicious Sweet Corn, Sweet Mango and Red hot inks.

The heart images are from a WMS set from a while back, Halftone Backgrounds, It's not currently available, but maybe someday. The sentiment is stamped in Gina K Dark Chocolate ink, I am so enjoying the Gina K inks, they have great coverage and are fast becoming my go-to range, just need a few more shades...lol...and then I'll need more cardstock and they have matching envelopes...oh you know how this goes....

Anyhow, hope you liked my little summery card, have a great hop!

Can I do blog candy? 

Yep, I think I can... I have a spare set of the Halftone Backgrounds set left over here in my office, was doing a little cleaning out over the weekend... it looks like this:


 This set is currently not available anywhere, and it's a large set, jam packed with halftone background images, it's a super versatile set, and I especially love it for Masculine cards.

If you fancy winning this set (it's clear photopolymer), then leave a comment here on this blog post. No awkward question to answer, just say hi! I'll pick a random winner on Sunday Night and pop out the winners prize on Monday! Ok, see you later!


Monday, 6 June 2016

...May 2016 Tiny Textures Incentive set Blog Hop


The Cast and Crew for Gina K Designs welcomes you to a special blog hop featuring the new Tiny Textures incentive stamp sets from the May StampTV Release Party! We hope to inspire you with some beautiful card projects as you hop along to each of the designer’s blogs!


Tiny Textures is a fun stamp set that allows you add a splash of something fun to your scrapbook pages or will help you to make a cool stamped background to your card projects. The “Just Because” sentiment from the set is ideal to add the finishing touch to a quick, but thoughtful card!

Now for anyone who is new to Gina K (I know, there's can't be that many of you, but just-in-casey here's how you get your hands on this set:

This stamp set ships free with any $75.00 order placed at Gina K Designs store! 
for more details see the store page here.


Here's the set:

 For my first card today I used the large paint brush mark, I decided to mask off a little strip of card across the front of my front panel and then I stamped the brush mark at an angle using some of my new Gina K inks. I stamped across the top of the mask and then back along the bottom in the opposite direction. I love the coverage I got with these inks, I was using a super smooth cardstock and the ink looks so solid right across the image, great result.

When I peeled back the mask (which was a strip of post-it note) it left me a nice wide space to pop in my sentiment. I used a sentiment from the newly released Coffee set. I trimmed out a little Coffee cup from the set and mounted it on a little foam, stamped the steam and Bob's your uncle.
I used the following inks:  Sweetcorn, Sweet Mango and Kraft - Can I just say that the Kraft ink especially is my new most favourite, I have been looking for an ink to match kraft card stock for a very long time...THIS is the one folks!

Here's the coffee set, it is full to bursting with coffee related stampy stuff - just in case you haven't seen it... ;)

http://www.shop.ginakdesigns.com/product.sc?productId=2528&categoryId=16


For my second card, I used the broad brush stroke again and made a plaid background with it using two tones of ink, I LOVE it, such a nice backdrop to any focal point, I added a rose from the Old Country Roses set. Tiny textures is cracking wee set, I haven't even scratched the surface here!

http://www.shop.ginakdesigns.com/product.sc?productId=2526&categoryId=16


So, off you pop - enjoy the gorgeous inspiration samples from the team and then don't forget to comment on each blog for your chance to win a $20 Gina K Designs gift certificate! To see who won, check the Big News Forum at StampTV a few day after the hop.

Ready for more awesome creations?! Just click on the links below for more from Gina and the Cast & Crew:

Gina K
Allie Gower
Beth Silaika
Cathy Tidwell
Claire Brennan
Donna Idlet
Karen Hightower
Kendra Wietstock
Melanie Muenchinger
Sheri Gilson
Silke Ledlow
Susie Moore

Don’t forget to pop over to the Gina K Designs Store and check out all of the new products available this month in the “What’s New” section at http://www.ginakdesigns.com.


Thank you for stopping by!

Friday, 25 September 2015

...Coffee Lovers Fall blog hop


Good morning, good morning! Welcome to the blog! I'm taking part in the Fall Coffee Lovers blog hop today! I love these - they are great fun and what a fabby subject matter! Coffee! Though I must admit I feel like a bit of a cheat as I'm a confirmed tea drinker, but I'm trying really hard to drink more coffee! 

 To see the other entries in the Fall Coffee Lovers hop check out the

The hop runs from today (the 25th Sep) until Friday October 2nd - get in!!

My card is pretty simple - I used the WMS Coffee Set stamp set and plenty of masking to create a big steamy cloud of coffee aroma for my coffee pot. I used circle punches to create masks, it was super simple. I did try it first in autumnal shades, but my oranges were getting a bit muddy, so I went for pinks and blues in the end. I suppose it's not overtly autumnal, but I do associate hot drinks with cooler weather, so maybe you will give me the benefit of the doubt on this one... I liked how the retirement sentiment fitted the shapes of the stamping, but this card would work with pretty much any sentiment. Hope it tickles!

http://www.waltzingmousestamps.com/products/coffee-set

Sneaky Blog Candy, right here!

As well as the usual massive haul of prizes that will be officially given away by sponsors (yep!! we're sponsoring too!) on the Coffee Lover blog - you really do need to pop over and check that out - I am giving away one of the two new Christmas sets that we just released on Monday - it's called Rustic Christmas quick piccie below. 

All you need to do is leave a comment here on the blog telling me what your favourite type of coffee is - I'd love to have your suggestions for what sort of coffee to sample - what should I be drinking, coffee-wise, that would convert me from a tea person to a coffee person?

Ok - I'm off - thanks for stopping by - can't wait to see you along the hop!

http://www.waltzingmousestamps.com/products/rustic-christmas


Friday, 3 July 2015

...sweet wishes


A couple of little gift tags this evening - I love the sugar bowl from Coffee set stamp set - used the stitched tags dies. These were SU inks - like these - I should develop this little colour scheme further. Gotta run, masses to do!

Sunday, 14 June 2015

...'Sprinkled with love' and colouring on solid stamps.


Good evening/early morning... technically it's still Saturday night at my house because I have not been to bed yet...so I'm slipping in a quick card this evening to show you the new Dinky Doughnuts set that was released on Monday. I had not gotten around to posting any of the samples for this set yet - so it's high time, but with the PJ party tomorrow I've been a little busy...hence the late night squeeze...

Are you coming to the PJ party? Yep, of course you're invited! All the info you need is right here.

OK I adore doughnuts...who doesn't. I wanted a set that I could stamp in solid colours. Just because they are sold stamps does not mean you can't colour them in... I love to colour, but sometimes I like flat colour - I get the best of both worlds with this set.

The Dinky Doughnuts set has three different sizes of doughnut and a selection of sprinkles etc. See the examples in the graphic below.To create these doughnuts on my card I used the stamp in the top left hand corner - that's the doughnut base. I used the stamp in the top right (black image) that's the glossy icing and I used some of the sprinkles stamps.

The finished size of these large doughnuts is exactly 1.5 inches in diameter. These are going to be easy to use with a wide range of existing dies and punches. The medium sizes doughnuts turn out exactly 1 inch in diameter and the mini doughnuts are just a hair over 0.5 inches diameter.

If you click on this pic it will get bigger so you can see how the examples work. There's a couple of little 'face and cheeks stamps so you can go all kawaii with these (yep my younger kids are going through that kawaii stage....)

http://www.waltzingmousestamps.com/collections/new/products/dinky-doughnuts


In the pic below the doughnut on the right is just stamped. the doughnut on the left has had a tiny little bit of shading added with two coloring pencils - that's all. Just the tiniest amount of shading can turn a flat graphic stamp into a more dimensional image - this makes me happy - 'more bang for my buck' I think they call it... :)


In every release I have there is always 'The Problem'.  Sometimes it's a late stock delivery, sometimes it's a realisation that I didn't order enough of a particular items and sometimes, (ok, only once ever) it's the realisation that I didn't order a particular item at all.... How red faced was I, chasing up the die folks, only to realise that the order email, for the dies for this set were...ahem...still in my draft folder.... doh. Hoping to have the dies for next release, in the meanwhile it's Spellbinders to the rescue for the overall doughnut shape and the mini circle die from the Simple sprig die set is just the right size for the doughnut holes...phew...


Hope it tickles!

Thursday, 11 June 2015

... Cozy Coffee baggie


Christmas is never too far from my thoughts and I had been itching to use that little mug from the Coffee set. In my head it contains hot chocolate, so naturally the thing to give with this card was mini marshmallows! Naturally! My coffee bag du jour contains mini mallows! Perfect amount to sprinkle on top of a mug of the hot stuff.

I love the new coffee baggie die and since I can't seem to stop making these, I'm looking at ways to add them to cards. Serendipitously, one of the new stitched rectangle dies is just the perfect size to create an aperture which fits the baggie perfectly. I used it to create a little hollow in the front of a raised panel into which I popped a baggie.


You can see in the pic below that  the front panel is around 3/8 of an inch raised off the cardfront. I made a sort of box behind the panel to keep it all tidy. If you would be interested in seeing the workings, leave a comment here, if enough folks are interested I'll do a tut.

The baggie is secured to the card by means of two holes punched all the way through from the front of the baggie to the actual card front - I threaded some twine through there to hold the baggie on 'til it was needed. I'm chuffed with how this works!

The papers were from the Authentique Cozy Collection.


Hope it tickles!

Tuesday, 9 June 2015

...I just wanna dunk you in my coffee


Every time I read this, in my head, I hear it in Gloria's (Madagascar) voice. Love that movie. Love doughnuts also, but what I really wanted was a doughnut set with the correct spelling! It's not that I'm a grammar nut, it's just that my mother's voice will forever ring in my ears telling me not to use 'slang' as she put it. My mum wanted us to speak correctly...which I guess would also mean that she'd want me to spell correctly... so we're just 'gonna' ignore that 'wanna'... right there...

The doughnuts on my card are from the We Go Together stamp set that was released yesterday and  they were trimmed out with the matching dies.

I used the new stitched rectangle sets to make the panels and mats.


Neat thing about the two sets of stitched rectangles - they mat perfectly together giving a nice fine mat. I made up the bunch below when I was testing the dies - they'll be great for some future project. I cut the white card with the Scalloped stitched rectangles and the brown pattern paper was cut with the plain Stitched rectangles.

Each set of dies has 6 dies, all based around a 4.25 by 5.5 inch card size
(this is the format I use most).


Our Coffee Bag of the day was made in patterned paper to match the card - I wanted to pop edibles in there - some little chocolate fingers for dunking in your coffee (M&S) and so I wrapped those in cling film before popping them in the baggie.


Did you enjoy the release yesterday? (scroll down) Anything you especially liked? let me know! I'm looking forward now to see what the DT come up with!

Right, back to the stock room for me! Nice chatting with ya!