

Good afternoon - hope you are enjoying the May bank holiday! I'm footering with camera settings and lights, trying to get some decent pics of cards. Today's offering is a 5x5 inch card I made up using various bits and bobs.
I like to stamp. I've never had much of a budget for embellishments and so I don't have vast quantities of goodies that I can combine to create beautifully styled collections on the front of their cards - I admire folks who do this well, but I don't have a lot of time to browse - and it's not like Northern Ireland is brimming with craft stores... These days, even though I could probably get a load of stash from my wholesalers, I often find myself overwhelmed with choice and end up back where I started, making cards with little other than stamps.
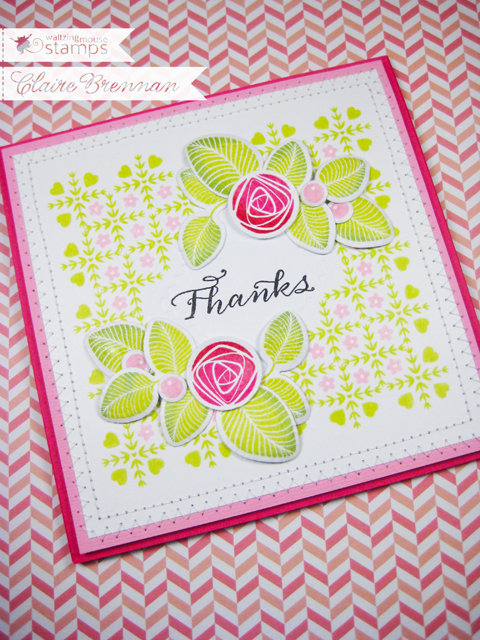
The card began with me footering about with an odd little stamp from the Cameo Creations stamp set. I like creating patterns so that's usually where I start when I'm just playing around. This little stamp is a cross shape - made of leaves with a mini heart at the centre, it's just so pretty and can be used to make up lots of patterns. It's that wee stamp, 3rd down on the left hand side in the illo below.

I stamped a little lattice panel with is for the front of the card - I left a little empty space in the centre for my sentiment (from Fine Feathers stamp set), which I blind embossed with a pinked square die from Spellbinders. The pics below show how I stamped the panel again, this time for the inside of the card. I didn't fill the centre in as much for this interior panel - to leave room for writing.

The first time I did it, I eyeballed it, but a grid of dots placed at 3/4 inch apart will help you if you fancy having a go at this.
once I had a square, I stamped the little cross in each corner


Then I added a few flowers - I used a teeny tiny flower stamp from the now retired Earth Angel set, but I'll bet you have something similar lurking about. You can use any small stamp for this, a dot, a mini heart, whatever you have to hand.

This is the interior panel all finished.

The Mackintosh style flowers and leaves on the front of the card come from Simple Sprig. I die cut the shapes first and then stamped my flowers and berries in pinks (SU colours - Pretty in Pink and Melon Mambo) I inked up the leaves in pale green - Memento Pear Tart and then sort of smooched along the edges a bit with a darker green - Bamboo Leaves, I like how that turned out. I did a couple of sprigs in this way. Instead of using the simple sprigs as one piece I chopped off various sections of leaves and single leaves. then I added a little dimension to my leaves by rubbing them with an embossing tool until they went nice and curly - I've heard this called burnishing. It's best to do it on a foam pad, but if you don't have any foam a few layers of kitchen towel work also. I worked on the leaves from the revers to that they curved forwards, but I worked on the flowers from the front so they have a cupped appearance - I liked the contrast.

Hope it tickles and don't forget to scroll down for your invite to our PJ party - it's on the 14th!
Stuff I used (It looks like Pretty in Pink SU ink is no longer available, but any pale pink would do):


Absolutely gorgeous! I love the colours you've used and thanks so much for sharing how you created the lattice!
ReplyDeletecheers Deborah! :)
DeleteLove the freshness of this. That green is so perfect and the layout is terrific. Have missed seeing your cards!
ReplyDeleteOch thanks Charmaine, yep I have been MIA for ages, but one major job is done, so maybe I'll get a little more playtime soon. :)
DeleteThat is awesome!
ReplyDelete:) ta!
DeleteGorgeous card, Claire, and your tutorial makes creating the background easy, peasy!
ReplyDeletecheers Moira! ta for visiting! :)
DeleteBeautiful Claire - and what a great way to use those teeny tiny stamps. Love how you've cut the sprig up too - I always seem to use the whole sprig on my cards - must get my scissors out!
ReplyDeleteTotal lightbulb moment Claire, don't know why I never thought of it before!
DeleteThis is so pretty. I love seeing how to use smaller images to create such versatile larger patterns. I also love that it is mailable. So many embellishments are pretty but too bulky for the post.
ReplyDeleteYep, that's also a good thing, although I don't mail as many cards as I should!!! ta for visiting Christine!
DeleteWow, absolutely lovely! Spring is busting out all over!
ReplyDelete:) lol, cheers Laurie!
Deletelove the pretty pattern you created
ReplyDeletethanks Tanja!
DeleteGorgeous pattern and those colors are so yum.
ReplyDeletethanks Maria!
DeleteI'm with you Claire, a big stamper. I don't stick a lot of stuff onto the front of my cards, even though I probably could. A good spatter of ink, some sequins and I am happy. I love what you did with this card too. Like you, I love making patterns and that Pear Tart ink is one of my favourites. I also love seeing what one can do with the smaller elements in a stamp set. As for craft shops, you should try living in France - craft shops are very thin on the ground! Pleased to hear you are getting some time to stamp too. Best wishes, Kate x
ReplyDeleteWow, Kate! I would have thought France was a really crafty place! and yep the pear tart is fab, as is the rhubarb, love those wee mementos!
DeleteJust beautiful. I love the sprig set so much.
ReplyDeleteLinby x
thank you Lynn!
DeleteBeautiful card Claire. Love how you've created the background and floral arrangements.
ReplyDeleteHugs Erika.
cheers Erika, thanks for stopping by!
DeleteSimply stunning! I love the colour scheme and your pattern making is superb!
ReplyDeletehugs Lynn!
DeleteOh goodness to Betsy, Claire, you were made to create! Look at this wondrous pattern. And embellished to perfection! Adore it all, colors, stitching and flora!
ReplyDeleteNancy - you are way too kind!
DeleteWhat a beautiful card!! Love the way you created the pattern! I LOVE small stamps that can create patterns! So fun to play with!
ReplyDeleteyep Jill, I love to stamp patterns! thanks for stopping by!
DeleteLove this card Claire: I often can't think of what to do with the little stamps in a set, so they sit idle. I love the pattern you created for the background: so pretty!! Hugs, H
ReplyDeleteHugs Helen - thank you! thanks for visiting!
DeleteClaire this is stunning! I can see by the looks of your gorgeous card that you enjoyed stamping this one ! Your background is Amazing ! Saw this a few days ago and I couldn't comment with my iPad .
ReplyDeleteoch thanks Marybeth! yep it was fun! ta for popping back!
DeleteA lovely card Claire! You are the master at using the little stamps to create wonderful backgrounds! Love the bright colors as well!
ReplyDeleteTa Julia! hugs!
DeleteStunning! You're an amazing stamper. This is so pretty!
ReplyDeleteTa Jeanne! :)
DeleteThe most beautiful card, so, so pretty :-) ... and a wonderful tutorial too. You have the most fabulous ideas, and are so skilled at bringing them to life!!
ReplyDeleteOch cheers Melodie - what a nice thing to say! thank you!
Delete