Pages

Thursday, 31 January 2013

Tuesday, 29 January 2013

Sending OOdles - Cut files Freebie Now available


ED - cheers Casey - much appreciated!

And some good news for anyone who has Compact Sentiments Two and an electronic cutter - I just posted the cut files to the store, They are freely available here - I have given them this time all together in one .svg file and all together in one .dxf file.

When I was using them for the Cameo it was super simple to just pick the sentiment I wanted and create a new file for it so that I could cut it out on its own. Normally I just cut a big batch and have them handy on the table somewhere.

I'd love to hear from .dxf users if it is the same for them - can you isolate the sentiment you need? or does providing them all in one file cause a headache? Do leave a comment here if this affects you.

For my card today I also used the Jam packed Cut Files (Also Free) with my Candy Jar stamp. I cut a turquoise mat and also a slightly larger black mat for the jar. - I love how easy this is to do on the Cameo. I filled the jar with hearts from My Heart. I cut out a batch of little hearts with the My Heart cut files on the Cameo and stamped the little hearts in a variety of colours (SU inks) to match my papers (Lizzy Anne - Neapolitan)

Can you see my home-made Washi tape there - that fabby houndstooth pattern from Anya's Heirloom patterns set? Two posts back are intructions on how to make your own washi tape!

hope it tickles!


...Chalkboard Challenge Winner

Folks I had a lovely time looking through all the Chalkboard Challenge entries on this post. Thank you so much for playing along with me, the entries were fabulous, I loved to see all the different takes on the technique and I loved how the technique sort of evolved throughout the challenge with some folks moving away from the double stamping towards a pencil shadow effect - surely this is what crafting is all about - experimenting and having fun!


Our Random number generator threw out Number 6 which was MaryBeth L!! - Congratulations MaryBeth L - shoot me an email with Chalkboard Winner in the subject line and I will sort out your prize!


Monday, 28 January 2013

...Monday morning Make...DIY Washi Tape Challenge?


Good Morning! I have another Monday Morning make for you! As I settle back into some sort of routine after the Christmas blur I am finding that Monday morning is a good time to post something to the old blog. LOL, let's see how long that lasts...

I thoroughly enjoyed the entries from folks who played along with our Chalkboard challenge last week and I will be announcing a random player tomorrow who will win a wee gift code for the store!

Trying to kick start mojo has never been easy for me - I am one of those twits who needs to have acres of time in front of me before I can tune into my muse and truly 'create' - this is pretty much never the situation in a house with 3 children and a full-time business, and so I often struggle. I waste a lot too...but sometimes, just sometimes, I make something neat. The added bonus with home made washi tape is that I also recycle!

I have yardage of tissue paper - I keep it when it comes my way wrapped around gifts or in packaging. I always KNEW it would come in handy for something and Washi Tape is that something.

I love washi tape, I have been making up little rolls of the stuff and it looks pretty all piled together on a shelf - must get around to actually using it. There are many tutorials on the web about how to do this, I use an easy method, because I am pushed for time.

I use double sided tape if I have it, but I use ordinary tape also if I don't have the double sided stuff in the right width. I lay out a piece of  tissue paper - I don't mind if it has been a little wrinkled, infact I prefer it to smooth tissue. I stick strips of double sided tape across the tissue paper. In my picture the gold backed tape is the double sided stuff.

The cream tape is masking tape - I had no double sided one inch tape available and I wanted some thicker washi tape so I'll show you how I do it with single sided tape also.


Next thing I do is run a rotary cutter down the side of the tape to trim it out and get rid of the tissue in between the strips. I use a rotary cutter because I was once a quilter, but scissors or a craft knife will do just as well.

This is what you are after - lots of strips of tissue paper with tape already adhered to the reverse.


Next thing to do is colour on the tissue - I like to use copics because there are lots of shades available and they dry quickly and I have no time to wait on anything drying...


...except for distress inks...love distress inks...


Then it's time to have fun stamping! - Anything you fancy, words, patterns, repeated images, whatever tickles...


And hopefully you end up with a bunch of lovely patterned tapes! The beauty of making your own tapes lies not only in the customization, but in the fact that you can make small quantities. If you are at all related to me you no doubt have rolls and rolls of the stuff that you will never use because  'strident red stripes' just don't really work on that many cards....

Stamps I used on my tapes included, Woodgrain, Victorian Frippery, Off Beat Backgrounds, Heirloom Patterns, Dainty Doilies large and Little box Labels for the herringbone patter.

The Washi tapes that you make with double sided tape are all ready to use - simply peel off the backing and adhere.


For tapes made using single sided tape such as masking tape or similar - there is onemore step to follow - run the washi through the Xyron machine to add stickiness to the reverse. Failing that you can just use a little clear adhesive tape on the reverse, or even a little thinly spread glue. Easy peasy.


Your tape is now ready to use! I was itching to make a wee card and decided that I wanted to make one that sort of co-ordinated with my tape - another thing you can't do with some  store bought tapes....


I used some of the same stamps in my background that I used on my tapes. Love that pale green tape with the white doily image especially much.


So, what do you think? Fancy having a go? Why don't we make this another challenge then, have a go at making some patterned Washi tape with your WMS stamps and use it on a card. Link up your card here and I'll randomly pick another winner!! The winner of this challenge will scoop a large stamp set of their own choice!

The links will open (hopefully) at around 2:00pm today (8:00am Chicago time) and close the same times next Monday - I argued with Mr Linky this morning and although I'm pretty sure I had the last word, you never quite know...

...Blink and you'll miss it


Sooo many times folks have asked to see my craft space and I have always resisted because I knew, I just knew, that everyone would think that I must have a palatial studio with custom designed storage and oodles of stuff.

Well...I don't! This is it. 'Tis true I had the garage converted last year, but as grand as that all sounds, the garage was always rather small and so what I gained was rather a sort of galley shaped scullery type space...as you see above.

The only reason you are seeing this tonight is because I made a card and then couldn't find it and had to tidy up in order to locate it...I'm a messy crafter and it might be some time before the space is presentable again, so here you are...

What you can't see is a small desk on the left and a tall cupboard on the right, but this is basically it. It's not what you would call impressive, but you know what? It beats this hands down...this is what I was previously working out of....giggle!


Anyhow, I still dream of one day having an entire room that I can dedicate to crafting, and if we manage to move house at some point that might become a reality, but in the meantime, I consider myself quite lucky to have a space at all. When I remember what it was like having to drag out boxes of stuff int the kitchen and then clear up and put it all away to make dinner, it was a nightmare!


Wednesday, 23 January 2013

...Freebie Sweetie Treatie cut files now available


The FREE cut file bundle for this little mini treat box is now available here. It contains 3 Versions of the sweetie shape - a plain one, one with heart windows that I used above and one with round windows. I also included a few little 'wraps' - you cut these out and wrap them round the outside of your assembled sweetie - you know how some sweeties have two layers of wrapping? - More opportunities for decoration i thought...

.SVG and .DXF files both supplied.

hope it tickles!

Scroll down for our current Chalkboard challenge!

Monday, 21 January 2013

...Monday morning make - a Technique Challenge


So I'm thinking Monday seems like a good day to make something and I fancied making it into a little challenge because I like the company....

Popping through the waltz projects the other night I was so inspired to try so many different things, but one stand out technique is this chalkboard look that I see around a lot on Pinterest. I suppose it's inspired by cafe boards and the like.

So, Just for fun I'm throwing out this challenge - I have made up my sample today in the Chalkboard style and I have a few hints and tips below on how to achieve this look.

I want you to have a go with me and see what you can do in the chalkboard style. I do ask that you use WMS on your project in some shape or form and if you don't have WMS stamps we have freebie templates here at the store, you could try jazzing one up!

I'm going to leave the challenge open for a week and I'm going to pick a random participant to win a £20GBP gift code for the store!

I hope you can join me!

Link your  challenge entries at the end of this post!

But first some tips... I'm using black card obviously and I rubbed it with a little embossing buddy that my pal Suezie made for me - you can just see it peeping in at the top there, but there's a better pic underneath (here is Suezies blog post about these little baggies). It's a little baggie of magical dust that stops the static in the paper from attracting the embossing powder - and it gives a much cleaner result as the powder only sticks to the Versamark, or whatever ink you chose to emboss with.

I started with my sentiment from Compact Sentiments Part Two - I stamped it in Versamark and then sprinkled over some white embossing powder.


Then I added some flourishes from  Flourishes Scallops and Dots and a heart from My Heart. I used the heat tool to set it all.


Then go back in with your stamps and stamp everything again with a white ink - I used PTI fresh Snow. It's a good idea to slightly offset the white stamping to give that rough chalk drawing effect.


Next thing to do is take a little scrap of cloth or paper towel nd just rub some white ink over the card - I practiced on a scrap of black to see how this would look and when I was happy that I knew the amount of ink I needed to pick up on the cloth, I rubbed it onto the stamped image.


You really don't need to be too careful, the key thing is randomness here I think. You can go in with some more stamps at this point and add some more design elements in the plain white ink - I added a few more swirls, it all helps to give the image a little depth.

Next thing to do is head for the lair of your closest school age child and search for a white coloring pencil, it'll only take you about a half hour per square foot of bedroom, and you might hit lucky and locate one in the first square foot....you can use this to add border lines or maybe some doodles.


When you are done it is just a matter of mounting your creation on a card front, simple pimple.

If you are like me and hang out at all the cheapo bistros you will often see that they use coloured chalk on their boards. This is so not the 'done thing' at those up market joints...no, this is more of a  'low brow' thing to do, but I thought it might be a little fun to add some colour to a few chalkboard samples....

I used a copic marker to add colour to my chalked images - now, don't split on me to the likes of Debbie Olson or Beate, those gals might spin on their heels to see what this does to your marker, and I really don't recommend it for large areas, but I just added a few highlights and quickly doodled some on a piece of scratch paper to remove the embossing residue that gathered on the tip of my copic... it was grand.


Made a little taggy, loved this one, handy things to have lying around for last moment gifts, and we are all about the last moment in my house...The image is from Labels 18 - I just didn't ink up the two dotted lines on the fancy label - the sentiment is from My Heart.
 

And finally I went all cheap and cheerful - even 'street market' with this one...but hey, it was fun! It's the largest image from the Labels 18 set and a wee sentiment from Compact Sentiments.


So, let's see what you can do!!

Link your entries here - You have until 2;00PM GMT next Monday 28th!


Sunday, 20 January 2013

January Blog Party Recap–and TWO Winners!

We were thrilled with the wonderful turnout we had for the January Blog Party.  It’s apparent that the break over the holidays  renewed your creativity. You certainly have a “love” for projects that express that emotion. We were pleased with the variety of projects and we are thrilled that you took time to participate.  We know that there are many on-line activities that are available for your participation, and we are happy that you deemed the WMS Blog Party worthy of your time and creative talent.  If you haven’t had a chance to see all the fantastic projects, it’s not too late, they can all be found here.

Each and every project was truly fabulous; each one unique and creative in design. The following three projects really caught my eye.

This card from Marybeth really caught my eye, not only because strawberries are my favorite fruit, but because of her clever way that she brought this stamped image to life. She used the berry from the Vintage Garden Produce set and achieved the shiny effect by heat embossing it. To add interest she added some tiny pearls that really give the berry an elegant feel. She framed her image with the seed packet image from the Vintage Garden – Seed Packet set.

The next project that made my jaw drop was this beautiful layout created by Claire A. Once again, a strawberry is included, but that’s not what drew me to this project (although my mouth is watering for some of this delicious spring fruit). What captured my interest is the creative way that Claire used WMS on her scrapbook page. With her trendy wood grain for her photo matt (from the Woodgrain set) she created the planks with their offset placement adds interest and movement to her page. Her Big Berries – Strawberry makes a fabulous accent for this layout, along with the Camellia leaves she stamped and cut out which made a great grounding line for her focal image.  Even her hidden journaling spot was created using the WMS Very Vintage Labels No. 1 set. Check out her blog post to see a closer look at her hidden journaling. Brilliant!

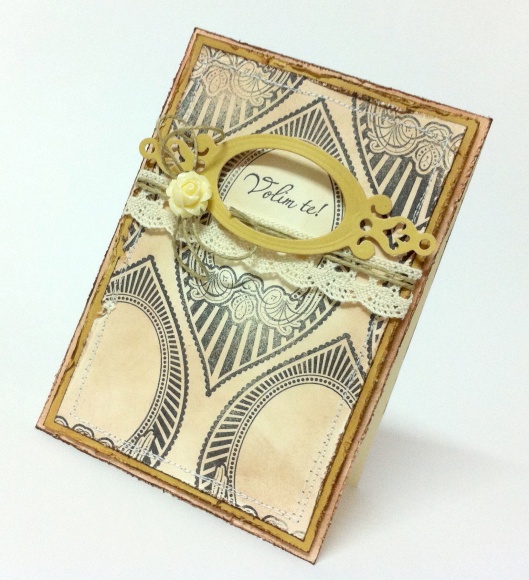
This card by Elizabeta Kushner showcases the versatility of all of Waltzingmouse Stamps’ images. She used her Ornate Ornament set to create this unique and romantic background pattern.  It never would have occurred to me to use a Christmas ornament image as a background image for a Valentine card. So very creatively clever!

IMG_6395


I actually “loved” all the amazing creativity that you all shared. Thanks go out to everyone who participated. There is so much creativity among WMS customers, and everyone is a winner because they have created and shared their work inspiring us at the same time. As a new year gift to you Waltzingmouse Stamps fans, Claire has graciously agreed to award not one but TWO winners for a free stamp set from her store. Those random winners are:

Sharron G

and

Sue in Grapevine

Congratulations, to you both.  Please e-mail me at Lmercurio at sbcglobal dot net and I will provide you with a code to use upon checkout in the store. Please use BLOG PARTY WINNER in your subject line

We appreciate EVERYONE’S participation and support of the “Blog Party”.  We hope you had as much fun blog creating as we did seeing your beautiful projects.

...a few snaps


Evening folks...it's been a while since I shared some snaps of Ireland...and I was looking
through some pics this eve and thought I might pop these up....

Also - do you see what i did there? I momentarily distracted you from the fact that I have not yet posted the free template from the waltz...it's coming... I was making it up yesterday but it started to snow and since it's been two years since we had snow - we all went out to play...

These images are from last summer and are, from the top:
Cinn Aird Beach near Dingle
Gallarus Oratory, 4 pics
A mountain lake along the Conor Pass
A road on the way to Brandon Bay

wish I was there right about now....

back soon with the template! :)


Thursday, 17 January 2013

Love is All You Need!


Blog-Party-Logo 70%25
Greetings and HAPPY NEW YEAR! Welcome to the January 2013 Waltzingmouse Stamps Blog Party! We are so happy to have you join us for this fun and inspirational event. Are you ready?  Good, let’s get started!

And an extra welcome to folks who may be joining us from the Moxie Fab Blog!! We got the Moxie Fab stamp of approval, check it out here!

To start off the new year of “blog parties” we have chosen the theme of  LOVE which can encompass lots of  varied creativity. Naturally hearts come to mind, and I imagine we will see lots of those today, but we also hope that you will reach beyond the obvious and really think about what love means to you.  It could be parental love, romantic love, love for a friend, love for country or God. Whatever way you feel inspired to express love – we are anxious to see your Waltzingmouse Stamps creations.
Here’s how it works: Upload your entries to your blog or on-line gallery and then link up your creation using the inlinkz tool at the end of this post. We will leave the links open for 24 hours so that everyone will have a chance to play along, even if you haven’t created anything yet!  Once you link your project, you can check out all the other inspiring projects by just clicking on their link. Be sure to include the Blog Party Logo (seen at the top of this post) on your blog to easily identify your participation). How fun and easy!

A random selection of time zones are given below for the timeline of this event:
UK - 6:30 p.m. 17th January- 6:30 p.m. 18th January
USA (New York) 1:30 p.m. 17th January- 1:30 p.m. 18th January
Australia (Queensland) - 4:30 a.m. 18th January- 4:30 a.m. 19th January
Canada (Alberta) - 11:30 a.m. 17th January- 11:30 a.m. 18th January
Malaysia - 2:30 a.m. 18th January- 2:30 a.m. 19th January
Norway - 7:30 p.m. 17th January- 7:30 p.m. 18th January
You have 24 hours to link up your creation!  We all look forward to see your “heartfelt” creative projects.  Be sure to check back on the 20th of the month when we will highlight a few of the amazing entries right here on the blog! We are looking for projects that showcases extra special effort! We will also randomly select a winner for a coupon code good for a free Waltzingmouse Stamp set.
Let the fun begin and enter your direct link to start the party.

It's Claire here interrupting Lynn to say I made it!! LOL, I finally made a project on time! My samples are above - wee sweetie shaped templates - it'll be free here tomorrow on my blog! The sample above has a heart shaped window into which I added cute folks from L'il buddies and some punny sentiments. For Valentines in my house, it's all about making the wee folks smile, hope this will do it! Don't forget to pop back tomorrow to pick up your free cut files/template - this makes a great mini treat holder, or a little table favor!

Hopefully you will see lots of the DT and Mischief makers playing along - Since we no longer run the challenge blog we have decided to combine all out fabulous ladies into one huge team - you can look forward to some pretty amazing releases from now on with all these wonderful ladies working together!!

Right, I'm off to make up the free files!


...It's Moxie Fab!!


Squeal!! I can't tell you how it feels when you click on a blog and there you are! Especially when that blog is Cath Edvalson's Moxie Fab World! My heart missed a few beats!! pop on over to see what Cath has picked out - she's going to pick winners!

I'll be back later today with our Blog Waltz!

Wednesday, 16 January 2013

...Reminder - Tomorrow is our first Blog Waltz of 2013


Just a quick reminder that tomorrow is the first Blog waltz of 2013 - our theme is love and hearts and all that gushy stuff and since I'm feeling expansive I think I might have a spot prize or two to randomly award to folks who take part!

So come on, get your WMS inky - all the info you need is right here!

Tuesday, 15 January 2013

...My Best of 2012

French Country

In no particular order I have 12 of my fave things I made in 2012. 2012 was a stand out year for me for many reasons and not many of them were good. I have to be honest and tell you that I was glad to see the back of 2012 and I'm not a person who relishes the passing of time.

Some of the ladies on the forum were doing around up of their 12 of the best of 2012 WMS (I think Pauline may have sparked the idea), and I had a quick peep through a few of the links. I was surprised by how many of the cards that I hadn't actually seen before. I probably shouldn't admit that, and I started by feeling kinda guilty about the fact that I hadn't been in touch with many of the challenge entries that we had last year. As time permitted I had a peep now and again, but I found that I was out of the loop most of the time (through my own busy schedule) and that though I managed a few sporadic comments, I never even got a chance to play along even once.

I thought I might follow the forum ladies and play along with a 2012 round-up and I am so glad that I have taken a few moments to grab some images of things I made last year that I was pleased with. I had pretty much surrendered 2012 to the dark side, it was the year my wee mum passed and it conjures images of sadness and loss for me, coupled with frustration and helplessness. Finding images of cards and projects I made last year that pleased me was like looking back into the woods and finding a little breadcrumb trail of shiny moments. I find that crafting is good for me, it helps the cogs turn, keeps the forward motion going, even if it is slow.

So here's to more shiny moments in 2013!

Nordic Spring

Bright Season

Half Pint Heroines

My Island

Vintage Garden sets

Jam Packed

Heroines - Fairy Princess

North Shore

Opera Tags

Yonder Star

Compliments of the Season Two