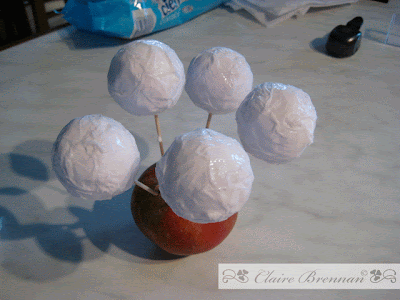
I used polystyrene balls and I coated them in tissue and painted on loads of PVA glue, the glue soaks through and dries reasonably clear so it works well for these wee ornaments. In order to do this I spiked the balls on toothpick sticks.


Once they were dry I added the snowmen in the same way.
Once the ornament was dry again I pushed the toothpick all the way through the ball so that it made a hole through the core of the snowball.
I pushed a huge darning needle threaded with one strand about 12 inches of thin ribbon through the ball. I then pushed the darning needle back down through the hole so that i had a loop of ribbon at the top and two tails at the bottom.
I knotted the tails to prevent the snowball falling off but really there wasn't much chance of this as the ribbon was a tight fit.
I made the box to my own design because I specifically wanted to use my 1 1/2" hole punch to make the little 'tidy' tray that sits on top of the snowballs in the box - I actually cut two of these trays and mounted one inside the box about 1/2" from the base so that the snowballs would sit nicely in place down in the little holes. The other tray I decorated with polka dots and put on top to tidy everything up.
I don't have plans at the moment to put a template up for the box as it isn't something that will print onto 8.5" by 11" cardstock, but if you need it leave a comment here and if enough folks are interested I'll see what I can do.
The box measures 4" wide by 2" tall - the depth of the lid is 3/4" if that helps anyone.


I think this is so cute and the brown just sets it off. I would like to the template for the box if possible. What a great idea.
ReplyDeleteYou did such a wonderful job explaining this, Claire! Another stunning project, that's for sure! :)
ReplyDeleteAlways fantastic!! Love your work.
ReplyDeleteTwila
These are just too fun. I had no idea when I saw your blog hop post that these darling ornaments were homemade. You are just too talented for words. You can always assume that we want tutorials on everything your talented fingers create!!! Thanks for sharing.
ReplyDeletethanks for the answer to getting the ribbon through. I always like to know how to make more boxes, but if it's not really at the top of your list I'm sure people can figure something out. Thanks again for the basic info.
ReplyDeleteThanks for the directions! I will be making them as a table favor for our crop groups Holiday lunch!
ReplyDeleteLoydene
I love reading your blog and checking out your newest creations. Oh please give us a template for the box. This is the cutest idea. Thank you for sharing your talent.
ReplyDelete