Pages

Tuesday, 30 August 2016

...Painted Autumn Blog Hop - Day 2


Welcome back to day two of the Painted Autumn blog hop! Today we are looking more closely at the 'Give Thanks' set from the Painted Autumn kit. In this set, you will find fun and cuddly critters, acorn, leaves and fun sentiments to make the most adorable card projects! There are so many possibilities with these sets!


Here is the entire kit:
The Painted Autumn kit includes:
  • Painted Autumn 6" x 8" stamp set
  • Give Thanks 6" x 8" stamp set
  • Give Thanks die set
  • Give Thanks 6" x 6" patterned paper pack
  • 24 sheets of card stock
  • 1 binder sheet
  • Plastic Storage Box
  • Weeks of project videos at www.stamptv.com

Enjoy the gorgeous inspiration samples from the team and then don't forget to comment on each blog for your chance to win a $20 Gina K Designs gift certificate! To see who won, check the Big News Forum at StampTV a few days after the hop.

My first card, above shows how easy it is to highlight some of the words in the longer sentiment by using a copic or other marker to just loosely draw over the letters. pick any colours you like, highlight any word you like - try this with other sentiments also!
I trimmed out the little squirrel with the dies that come with the set and the patterned paper is from the 6x6 paper pack included.

This card was shown at the release party, and I just couldn't resist adding a little face to each of the pumpkins (got the face stamp from the recently released So Cool stamp set). I think it really adds to the 'happy' fall sentiment! I added the lined and stitched border to my green layering panel and then added an orange/yellow panel behind that again to help highlight the focal image. to make the orange/yellow layer I simply started with cream card cut in a circle at the size I wanted and then and used the same copics that I used on the pumpkins to to colour around the edge. Simple way to get a perfectly co-ordinating layer panel.

This CAS card was created using the larger leaf stamp, which I just stamped around in a circle. Once the ink was dry, I coloured with copics and added my sentiment - I highlighted the letters with a variety of copics to match the leaves and popped on a few sequins.


I showed this card at the party the other night also - the moment I got the stamp set I was itching to break out the shrink plastic and make some tiny leaves to put in a shaker card, I thought the idea of 'falling' leaves would be perfect for this kit. I made the shaker element in a little pouch which I fastened behind the window. I cut a patterned paper from the kit to suit the front of my card and provide a base for my happy squirrel. He was stamped, coloured and trimmed out with the matching die.


My last card features the bear, I die cut him also, but went on to trim around his arms with a kraft knife so he could hang over my sentiment panel. I stamped a bunch of the pumpkins behind him so it looks like he has his own pumpkin patch, which I thought went well with the cute sentiment.

Are you ready for more inspiration? Just click on the links below for more:

Gina K
Beth Silaika
Cathy Tidwell
Claire Brennan
Donna Idlet
Karen Hightower
Kendra Wietstock
Laurie Schmidlin
Melanie Muenchinger
Sean Fetterman
Sheri Gilson
Silke Ledlow  
Susie Moore
Theresa Momber


Don’t forget to pop over to the Gina K Designs Store and check out all of the new products available this month in the “What’s New” section at http://www.ginakdesigns.com.

Thanks for popping in!

Monday, 29 August 2016

...Painted Autumn Blog Hop - Day 1


The Cast and Crew for Gina K Designs welcomes you to another fabulous blog hop celebrating the new Painted Autumn StampTV Kit! We hope to inspire you with some beautiful card projects as you hop along to each of the designer’s blogs! 

Today, we are featuring one of the stamp sets from the kit - Painted Autumn


 Featuring a 3-4 step floral image, together with a lineart image, you can create flowers with as much or as little depth as you choose.
Stamp one flower, stamp a bouquet - you choose!

Here is the entire kit (click to enlarge):
The Painted Autumn kit includes:
  • Painted Autumn 6" x 8" stamp set
  • Give Thanks 6" x 8" stamp set
  • Give Thanks die set
  • Give Thanks 6" x 6" patterned paper pack
  • 24 sheets of card stock
  • 1 binder sheet
  • Plastic Storage Box
  • Weeks of project videos at www.stamptv.com
Enjoy the gorgeous inspiration samples from the team and then don't forget to comment on each blog for your chance to win a $20 Gina K Designs gift certificate! To see who won, check the Big News Forum at StampTV a few days after the hop.


My first card today uses just the lineart images of the two sizes of flower and one of the leaf/vine stamps. I stamped in memento onto the Ivory cardstock from the kit and then colored them in just like I would with any line art stamp. These beautiful stamps are drawn in a loose painterly style which lends itself really well to good ol' colouring in! I don't feel like it's necessary to be just so fussy as normal with these little flowers, it really ads to the overall look if you go just over the line in a few places, these suit me down to the ground! Card base is the lovely Sweetcorn cardstock from the kit.


For my second card today I have used two of the possible 4 stamps to create the flower. I used the full solid flower shape, which I stamped in Sweetcorn and Sweet Mango inks, both Gina K. Once those were dry I went in with the lineart stamp in black.

This set is very versatile in that you can stamp all 4 layers of each flower, or only one layer - like in my first card, or only two - like in this card, or just 3 - it's totally up to you.

Again I love the slightly offset look and so I didn't stress about perfection when lining these up - it's all about that loose painterly style! Here's a close up on one of those blooms, you can see how I didn't bother to clean my stamp in between stamping the yellow and orange solid shapes and I have a little blending of colours going on there, which I loved!

I took the 'So thankful' stamp and masked the 'thankful' work so that I could stamp 'so' all around the floral pattern. Then I masked the 'so' and stamped the word 'thankful' on my sentiment band.

The card base is the beautiful Ivory cardstock included in the pack, as was the lovely sweetcorn cardstock that I used on the sentiment panel.


just in case you need a hand lining up your stamps when you are layering these, Gina has prepared a couple of cheat sheets, here they are (click to make bigger or download your own larger PDF files from under the video presentation here on Stamp.TV):


When you are ready for some more inspiration, 

simply click on the links below for samples from the Cast & Crew:

Gina K
Beth Silaika
Cathy Tidwell
Claire Brennan

Donna Idlet
Karen Hightower
Kendra Wietstock
Laurie Schmidlin
Melanie Muenchinger
Sean Fetterman
Sheri Gilson
Susie Moore
Theresa Momber

Silke Ledlow

Don’t forget to pop over to the Gina K Designs Store and check out all of the new products available this month in the “What’s New” section at http://www.ginakdesigns.com.

Thanks for popping in!

Sunday, 28 August 2016

... Heads up, Painted Autumn Blog Hop tomorrow!


Just thought I'd let you know that there's a blog hop happening tomorrow and Tuesday to celebrate the new Painted Autumn kit from Gina K designs - have you seen it? The DT opened the bidding at the party last Thursday night over at Stamp TV. This is one of the cards I showed at the party, I will have plenty more to show you tomorrow and Tue, so get some chocolate and coffee ready and call by then for some fabulous fall inspiration!

This card features the bear from the Give Thanks set, I die cut him first with the enclosed die and then I trimmed around his arms and had him hang over the sentiment panel. Behind him, I stamped up his very own pumkin patch. The red paper is from the kit also, as is the brown cardstock. I mahe a matting layer using cream cardstock and just coloured the edges of it with the same copics that I used on the pumkins, so that it would match the yellow/orange tones. Simple pimple! Hope you likey!

Here's the full reveal of the kit, there are two super stamp sets, a pack of lovely autumnal papers, 24 gorgeous colours of cardstock (The color palette includes Red Velvet, Honey Mustard, Ocean Mist, Fresh Asparagus, Sweet Corn, Dark Chocolate along with Ivory accents), cutting dies for the Give thanks set (set with the critters), binder sheet, storage box and there will be weeks and weeks of videos to accompany this kit, so you will not be short of inspiration this autumn!

http://www.shop.ginakdesigns.com/product.sc?productId=2673&categoryId=16

Friday, 26 August 2016

...New Kit release party at Gina K's


Just a quick head's up - the Gina K New Kit - Painted Autumn is being released tonight, in fact the party starts in less than an hour - are you going? It's just a click away right here - there will be a full kit reveal, contests and lots of inspiration in the party threads at the Stamp TV forum - come on over!

Tuesday, 16 August 2016

... it's still sizzling....


It's pretty warm here in the old N of I today, and so I was feeling a little tropical this morning. Only had time for a quick card - a little smooshing of inks in the background and then a nice crisp silhouette of a palm tree. (Gina K Dark Chocolate Ink)

For some reason I thought this would look neat with a little melted gold on the edges of the brown cardstock panels, jury is still out, but I'm running with it anyhow... love the pinks and oranges though...

http://www.shop.ginakdesigns.com/product.sc?productId=2647&categoryId=16

Made this with the My Island stamp set, just released over at Gina K's - check it out by clicking on the stamp set image, it's perfect for a little high summer sizzle!


Sunday, 14 August 2016

...A County Kerry postcard


So a few weeks ago the old blog was a bit vacant - I had run away to County Kerry for the fortnight (took the family of course...), it's my very favourite place. I took over 1500 pictures and my people are bored rigid looking at them, but I thought maybe you might like to see a few snaps, some of these days I'm going to buy a big fancy camera, one with all the bells and whistles.


This is Blackwater Pier, just outside Kenmare.


There's an awful lot of these in Kerry, think this one is just outside Glengarriff.


May have called into a few of these... has to be done.

Saw literally billions of these...

Found this shop in Cork City - my new favourite craft store, pity it's a 5 hour drive away...


look... and just fyi, they do mail order from their webstore right here
Besides the acres of craft they sell acres of books.
 
want to quilt again now...


Maybe one or two more spirit grocers were visited, like McCarthy's of Castletownbere


Lots of history, I love history. This is Ross Castle, Killarney.


and more of my pet photography project - Irish windows.

Hope you enjoyed the spin!

Thursday, 4 August 2016

...Freebie, Nursery blocks cut file


Afternoon folks! I have a link right here for you if you wished to have the cut file .svg format for the nursery blocks that I made for the Gina K Designs release of the Bella Elephant stamp set. You can get the cut files by following this link, where you should be able to download them from my drop box! Enjoy!

Tuesday, 2 August 2016

...Gina K Designs DT Blog Hop, Day 2


Welcome to another fabulous blog hop celebrating the new stamp sets from the July StampTV Release Party! We hope to inspire you with some beautiful card projects as you hop along to each of the designer’s blogs! Today, we are featuring stamp sets by Beth Silaika and little old me, Claire Brennan. I have over 20 photos to show you - so you need to pop off right now and get that mug of coffee/tea - whatever will sustain you through the following inkfest.

Bella Elephant

The first set we are featuring is Bella Elephant by Beth Silaika. Beth has created a super cute set with the sweetest images and matching sentiments to make the perfect card project!


I thought the Bella images would be perfect to decorate some baby blocks - and I made up a little template for the blocks. I am trying to get the template ready to giveaway as a download and I may or may not have that ready by the time this post goes live - watch this space. ED - The template will be available here tomorrow, I'll put up a new post for it, it was too much for today's post! So pop back tomorrow for the free download!

The blocks are made of card and they are hollow, I created mine with room decor in mind, and sealed them shut, but when you make these, you could easily leave them open-able and put little gifts such as baby socks or little washcloths or pacifiers in them.

I stamped Bella and coloured her using copics and then added thin frames and the A, B and C - these should be included in the download so you can replicate what you see here exactly if you wish - it's super simple. I coloured my little elephant yellow and used some patterned papers from the  Sending Love paper pad to create my colour scheme.

I made up a matching card to present along with my blocks. Simple assembly, stamping and colouring, and what a neat set you will have to present to your next mum-to-be.


Next up are my sets, sure hope these tickle!

Petite Patisserie

http://www.shop.ginakdesigns.com/product.sc?productId=2649&categoryId=16

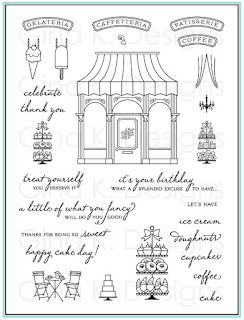
A brand new set featuring a large store stamp with two 'dressable' windows and all the little bits that you need to dress this up as a cake shop, an ice cream parlour or a cafe, and all with a little European flair. Even teeny curtains! After all, why say 'Cake Shop' when you can say 'Petite Patisserie' lol! I love this set.

This tip sheet shows you how the accessory stamps (in orange) can be used with the main store image (in black) - there's a multitude of options!


This set can go as simple or as fussy as you like - let's start with fussy shall we? This Patisserie features cakes - these could be birthday or even wedding cakes,
depending on your need.


The idea is simple - stamp and colour - but if you look close up, you can see that I have cut out the windows and then added some curtains in behind. I cut out the curtains too, because I wanted the cakes to be 'behind' the curtains - I had such a load of fun with this set. ALL of the lines that you might want to cut are very simple on purpose, there are no awkward lumps or bumps protruding anywhere that you might want to cut! Just simple clean lines. You can achieve a really detailed look with simple trimming. I used a craft knife, it's way easier than scissors for cutting out internal shapes.


Create a Coffee Shop, below - I simply trimmed the windows and added curtains behind and then the tables and chairs behind that. I would love to show you how easy this is and I'm planning a how-to post in the next day or two where I show you the behind the scenes on how to put a card like this together.


You may have seen this Version already, I shared it at the party:


Of course you don't always need to use the full store when you make cards with this set, the smaller images work well with the sentiments also!

So Cool

Something a little simpler now - the So Cool set. Another brand new set!

http://www.shop.ginakdesigns.com/product.sc?productId=2651&categoryId=16

A super clean, super simple, ice cream and lolly set. A selection of faces is included for folks who enjoy the kawaii look, and indeed these are terrific for adding meaning to your card - take a look at this card below. I stamped some of the small images in two rows and added the sentiment 'you're the coolest ever' together with the word 'dad'. I was able to add the little moustachio-ed face to the orange lolly to reinforce the masculine element.

A super simple, single layer, masculine card, AND you get to use all the bright colours that you sometimes don't associate with 'man cards'! win win!


Or what about this - for the 'coolest ever coach' - reinforce the idea of a 'team' by adding tiny faces to the little triple ice cream cone - I love this so much!

I included some vital words in this set such as 'dad' 'mom' 'nurse' 'doctor' 'teacher' 'friend' 'coach' - these can all be added to the larger sentiments to create specific cards in case you want to make something jolly for the important helpers in your life.


Sweet Thing

 The next set up is Sweet Thing, another brand new set. This is a cupcake builder set and I believe it to be the most versatile cupcake builder set that I have ever seen.

http://www.shop.ginakdesigns.com/product.sc?productId=2650&categoryId=16

This is what the set looks like (click image to make it bigger), below is a tip sheet that shows examples of what you can create with these stamps.
Here's how the tip sheet works - In the top left is a small image of the stamp set -  you can see that I have put numbers beside the various stamps in the set. On the right hand side and at the bottom I show you how to 'add' these pieces together to create the cupcakes featured. 


On this card below, I stamped the cupcake from the bottom right corner of the tip sheet (I added the little banner as an extra) and you can see what pieces go together to create it. Once you get the hang of this, the combinations are endless. I will be doing a dedicated blog post about this set soon also.

There are a ton of sentiments in this set also - I love this one:

 This is another cupcake combination from the set - there are plenty of options for birthdays, babies, weddings, and any other day that cupcakes are required. The little teddy, angel and rose can all be used on their own also.


When I got to the end of drawing this set I had a wee area of blank space and I hate to waste space! So, I drew up a little apron label type stamp - it has room for you to write your name and it's a little 'from the kitchen of' stamp - I love it, it's perfect for when you bake and you are giving out little informal gifts - like these jars of cookies - they are re-purposed salsa jars containing some homemade spice biscuits, simply dressed with a square of fabric and a little apron stamped tag - perfectly simple, the work of moments!


My Island

My Island is a grungy silhouette style tropical inspired summer set, I brought it with me to Gina's from WMS and I love it. Here are a few samples that long time WMS folks might recall, but other folks may not have seen! You will have seen this set featured in Gina's video at the release party.

http://www.shop.ginakdesigns.com/product.sc?productId=2647&categoryId=16


It's been a long post, and thanks for sticking with me, I'm going to stop waffling, but if there's anything you need to know, just leave me a comment and I will reply to you - in the comments. I'll be posting lots of How-To's over the next couple of days, so when you have recovered, you might like to pop back! :)

Don't forget to comment on each DT blog for your chance to win a $20 Gina K Designs gift certificate! To see who won, check the Big News Forum at StampTV a few days after the hop.

After a small nap and some food, you might be ready for more awesome creations?! Just click on the links below for more from Gina and the Cast&Crew:

Gina K
Beth Silaika - illustrator for Bella Elephant
Claire Brennan (Me!) - illustrator for My Island, Petite Patisserie, So Cool and Sweet Thing
Allie Gower
Cathy Tidwell
Karen Hightower
Kendra Wietstock
Laurie Schmidlin
Melanie Muenchinger
Sean Fetterman
Sheri Gilson
Susie Moore
Theresa Momber

Don’t forget to pop over to the Gina K Designs Store and check out all of the new products available this month in the “What’s New” section at http://www.ginakdesigns.com.

Thank you for stopping by!