Good afternoon, I'm a little late with my post due to an unscheduled bout of tonsilitis in the house (!) but I am delighted to show you at last, something I made with the new stamp set USA 1776. This set along with Country labels 4 will be available on the store from Wednesday!
Just in case you have not seen them already, here are the DT ladies who are previewing with me today!
Anya
Becca
Clare
Jean
Karin
Kim
Laurie
Teresa
Tosha
USA 1776 is a large image based set of 19 stamps. It's perfect for 4th of July celebrations of course but it's quite a versatile set in that as well as celebrating Americana, you will find it ideal for celebratory cards of many types.
For my fist project I wanted to show you what you can do with just TWO of the stamps from the set. These are the kite shaped stamps and yes, you could use them to create kite designs on your cards, but they were specifically designed to make Americana style stars! Love me some stars!
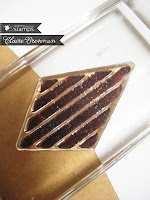
There is a starred kite and a striped kite
I'm going to work a little backwards in this post - there are some how-to images at the end, but right up front I wanted to show you what you can make with these two kite stamps and a Spellbinders Star die template - the largest one in the set.
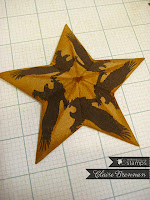
Aren't they pretty? While I was experimenting with the stars and stripes I thought I'd try out another idea, I stamped the landing eagle image 5 times in the star shape, quite liked it!
HOW TO
There is more than one way to make up these stars and I have a little round up of the easiest ways to do it here.
1. Cut first, stamp after.
You can trim out the stars with your die fist and then line up the kite shaped stamp on each point. doing this will create a star with space in between the stamped images.
2. Stamp first, cut after
I like to stamp the star kite first and then do stripes either side - this way, if my lining up is not accurate and the last point overlaps a little, then it's only stripes on stripes which is not as eye-catching as stripes on top of stars. Making the satr this way gives you a star with no spaces in between the stamped images.
See the contrast below
3. Cut, then stamp alternative.
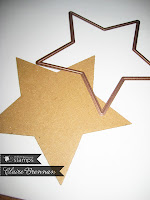
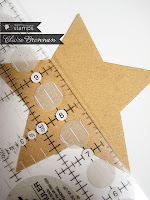
If you have already trimmed out your stars, and want to be sure that your stamped star is perfectly centred and has no gaps, you can do this - use a ruler to draw a line from a point of the star to the dip in between the opposite two points. Repeat this on another point, where the lines intersect is the perfect centre of your die cut star. I marked it by piercing a little hole, see the second pic. It is so easy to line up your first kite stamp on this pierced hole and get your first impression perfectly centred. Just carry on stamping your star using the first impression as your giude, it could not be simpler.
this method gives you a perfect star with no gaps.
4. Adding dimension -
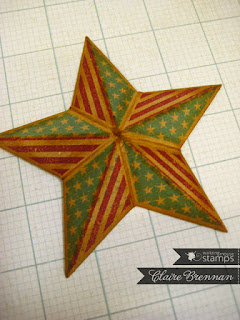
I used my Scor-Pal to crease my star, working from the points to the opposite side. I flipped the star over and folded the star a little to really define those creases, then I sponged with Corduroy Distress ink to antique it a little. I really like to use stars that have the gaps in between the stripes and stars for this. If I was going to keep my star flat and uncreased I might prefer a star with no gaps, it's all down to what look you want to achieve.
5. Experimenting
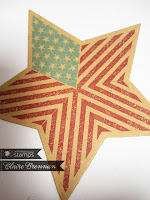
Now that you know how, you can experiment with the design of your stars, this simple masking technique using a post it note gives you yet more options for the design of your stars - this is where clear stamps really come into their own - you can see what you are doing.
Notice how I use the edge of the green post-it note as a guide, I position my stars kite so that the centre row of stars is bisected by the post it note, this ensures perfect placement - the stamps are designed to be symmetrical so that you can use little tricks like this to help you get them in the perfect position. This method above produces this star below.
Sure hope it tickles!!!














I'm so excited about this set, and what a great way to use these stamp! Loving this, wonderful tutorial!
ReplyDeleteThis is seriously awesome! I love everything about this set. Thank you for the fantastic tutorial! Have a wonderful day!
ReplyDeleteWow - very cool stars and neat techniques. Thanks for sharing.
ReplyDeleteJaw dropping AWE Claire! So beautiful! Love all the different ways of using these stamps! Your designs are always so truly WONDERFUL!
ReplyDeleteI hope your little one is better soon! Strep is no fun!
:) Jill
these are just beautiful. Looked at all the creations on the hop and think you have a real winner with this set. Thanks for the reminder that kites can make stars.
ReplyDeleteWhat a great banner Claire! love the old look with the kraft - super stamping - love the piece on the spool!
ReplyDeleteMind blown! Mouth drooling! ROLL ON WEDNESDAY! I want these! What inks did you use? Mine never show up on Kraft :-(
ReplyDeleteWhat fabulous post and a great new set!
ReplyDeleteHope everyone is on the mend!
ReplyDeleteI love this project! I do a 4th of July tree with stars and light and this would be just perfect! TFS
WOW! Be still my beating heart! I love these! I just put a reminder on my gmail calendar so I DON'T FORGET TO GET ONE OF THESE on Wednesday!!!!! LOVE THEM!
ReplyDeleteI LOVE your banner! The stars are awesome.. thanks for the tutorial!
ReplyDeleteWowzers! This star garland is amazing! What a creative stamp set with sooo many possible uses!
ReplyDeleteReally looking forward to the release - this is a fantastic set with so many possibilities. I do like your tutorial too - so helpful! Love the banner.
ReplyDeleteAwesome bunting and fabulous tutorial. Thank you.
ReplyDeletehttp://pinterest.com/pin/415386765601260583/
Pardon the pun but Claire, you're a star:-)
ReplyDeleteEeeks.....LOVE this banner!! Those stars are fab!! Maybe I'm going to have to have a July 4th party now!! The little spools are perfect!
ReplyDeleteBrilliant tutorial Claire! I love how your mind works! There's so much to love about this set :-)
ReplyDeleteThat weird sound you just heard?
ReplyDeleteThat was ME...
screaming across the pond about how utterly fabulous this is!!
You amaze me with your vision...
this banner is beyond fabulous...
love, love, LOVE it!! :)
And hope your little is feeling better...
strep!
Yucky!! :(
Amazing! Love everything about this!
ReplyDeleteOMG--amazing banner, Claire! Thanks for your wonderful tutorial! I know I'm going to love this set!!
ReplyDeleteAbsolutely terrific!!! I love this project!!!
ReplyDeleteAwesome! Such a great idea. Thanks for sharing.
ReplyDeleteMy set yet!!! Love it!!!
ReplyDeleteAmazing banner Claire!!!! Thanks for the tutorial!!!
ReplyDeleteI absolutely love your banner!!! Thanks so much for the tutorial!
ReplyDeleteYes, it does tickle!! Thanks Claire!
ReplyDeleteWhat an awesome set this is for we American WM followers! I am SO excited to see this set in full tomorrow!
ReplyDeletewow, fab tutorial Claire!
ReplyDeleteFabulous banner Claire, and a great tutorial too!
ReplyDeleteI love this! Such a great release and project Claire~
ReplyDeleteWow...I am not usually too crazy about flag things, but I love these flag stars!!! Thanks for the how-to.
ReplyDelete