
Nope, I'm not apologising! Christmas creeps up and surprises me every year! No matter when I start I am never ready, so there's no time like the present!!
This is a little set I made just before the release took hold!! - By the way, there is light at the end of the tunnel and by tomorrow morning I should be completely caught up with orders! I just thought I'd put this up, it's the blog equivalent of ambient elevator music...it'll entertain you while I'm too busy to really 'be' here...lol!
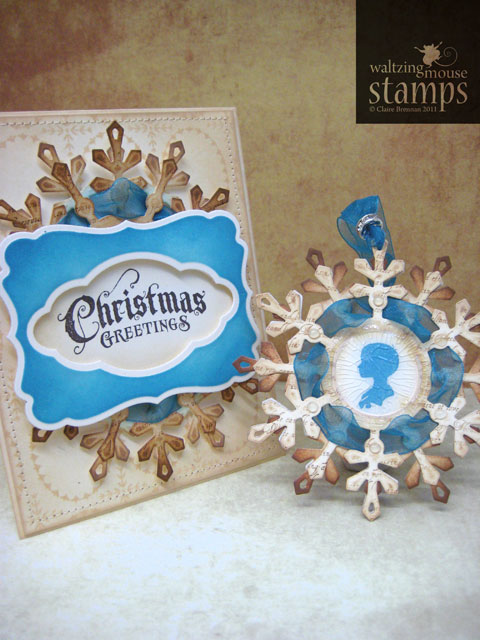
The interesting bit is the tree ornament - I recently got the lovely Spellbinder snowflake dies....ahhhh...

I made a little snowflake with a panel in it for a cameo of my favourite little boy, I am super lucky in that this little pic is actually drawn from my little dude, on a tidy hair day, but I think it makes a lovely nostalgic, Victorian style ornament even if it didn't have any sentimental meanings attached.
I used that fabby crackle glaze from ranger to get the cracked texture over the image. In all, I trimmed out the large snowflake 3 times, two of them face front and the last one faces back, I didn't want the back of my ornament to be unfinished and so it's just the same on both sides.
I wanted a card to match, as I think this would make a nice wee 'aside' gift for granny! I took my cue from the ornament, but added a sponged blue frame around the sentiment. The gorgeous frame shape is a labels Seventeen. I added a ribbon tag (Ribbon tags trio 3) to the centre so that it would cut out as a nice frame, I then sponged it with tumbled glass distress ink with a touch of Lapis Lazuli Versacolour ink. The sentiment is from Compliments of the Season. The background of the card is a pattern stamped with ovals from the Cameo Creations set.

Stamping the background pattern.

Cutting the snowflakes - see how I added a classic circles die to the centre of the snowflake, so that the snowflake would come out as a frame - I placed a little stamped image of the junior boy in the frame.


I sponged the snowflakes one darker than the other and layered then, giving the top one a little turn so that the flakes don't quite line up and you can see the darker flake behind.

This is the reverse of the ornament - you can see the sheer ribbon threaded through, and the glue dots where I am just about to adhere the reverse snowflake.

Hope it tickles!!


Absolutely stunning Claire! I love the snowflake dies, it makes a fabulous ornament! Love the card and the stamped background, I'm going to give that a go my self tomorrow lol!!
ReplyDeleteWow...this is fabulous. A wonderful ornament and a beautiful card. Love your combination of nestabilities to create this stunning duo.
ReplyDeleteGorgeous - and a stunning die template too! :-)
ReplyDeleteABSOLUTELY stunning! Granny is going to be one happy lady! :)
ReplyDeletewow this is amazing. beyond tickles!!
ReplyDeleteWow!!! Claire your project is just fabulous. The ornament is so sweet and I love the blue ribbon! The card will make Granny super happy! Great work!
ReplyDeleteClaire, lovely card and ornament. BUT - there is no need for you to ever be caught by surprise again by Christmas - come join us in the WMS Christmas Card Challenge and be ready for December! :-)
ReplyDeletehttp://www.waltzingmousehouse.com/viewforum.php?f=38
LOL!!! Charmaine, yup - I walked right into that one!! lol!!! it was always my intention to play along, wonder could I do 6 months of challenges in the next couple of weeks...
ReplyDeleteHA! Charmaine is funny!!
ReplyDeleteWhy apologize? It's less than halfway to Christmas already! I love your ornament, particularly because of the sentiment to you (being that it's YOUR little munchkin!), but what a neat idea anyway! As always, I just adore your creative ways... :)
Just beautiful! Thank you for the tutorial. You never can start on Christmas early enough, I know we all don't want to face it in July, but it will come weather we like it or not. Have fun!
ReplyDeleteMy goodness, Claire, these are gorgeous! I love the background on your Christmas card. Very creative!
ReplyDeleteLove the punch of that blue in the project! Very creative! Love it.
ReplyDeleteClaire the snowflake is awesome... I love the card too.... ROFLOL.... no need for apologies.... here i am thinking how i'm so behind because i haven't started making Christmas cards yet!!!! I am thrilled that you are sharing new ideas for card ideas... I need to get going on making those cards!!!
ReplyDeleteOh, wauw, Claire, this is gorgeous! Love the touch of blue in there! And the shape of the snowflake is perfect!! Very, very nice! It does tickles, though I can not yet put myself to making christmas cards, yet, hi hi! But you're a true christmas-cards-making-star!!!
ReplyDeleteHugs, Wendy
Yes it tickles, it's beautiful.
ReplyDeleteEveline.
Yes, it tickles. Ornament and card are both beautiful.
ReplyDeleteEveline.
This is stunning creations Claire! :)
ReplyDeleteOh goodness sweetie this is stunning! :) Hugs x
ReplyDeleteAmazing, Claire! I love how you created your own frame, and the cameo in the snowflake is so sweet!
ReplyDeleteI can't wait to get my new stamps :)
Claire - I love the snowflake frame and your card is over the top - so pretty. I want to know how you get your spacing so perfect! LOVE IT!! Grandma will be THRILLED - I bet she is already your biggest fan! I really love the blue and brown together! Brilliant!
ReplyDeleteThis is so beautiful, Claire. An ornament to be treasured each year as it is rediscovered at Christmas time. That's one of the things I love about trimming the tree - opening the boxes of ornaments and encountering the memories associated with each one.
ReplyDelete